Tip #4 – Trim to Fill
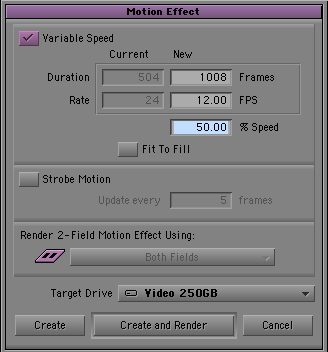
Most of us have been making our motion effects the old fashioned way, using Avid’s trusty “Motion Effect” dialog box. This is reliable and predictable, especially for work that has to be reproduced on film with an optical camera. But today, most of us are working in environments where effects get conformed digitally, and that means we no longer have to restrict ourselves to integer speeds (1/2x, 2x, 3x, etc.).
The alternative is to use Avid’s Timewarp tools. They allow you to create motion effects at any speed you like. Modern effects workstations can conform these things very cleanly in most cases.
The easiest timewarp to use is the “Trim to Fill” effect. It’s initially a bit counterintuitive, but once you’ve tried it, I think you’ll find that it becomes a standard part of your toolkit.
First, cut the clip you want to slow down or speed up into your sequence. Then drag the “Trim to Fill” effect icon to it. Now go into trim mode and grab either end of the clip and stretch or shrink it. You’re not actually trimming the clip. It’s first and last do not change. Instead, you’re adjusting the speed of the clip. If you lengthen it, you slow it down. If you shorten it, you speed it up. To reflect the change, a percentage gets apended to your clip name. “27A-1” becomes “27A-1 (150%).” Note that the percentage refers to speed, not length. 200% means the clip is running at double speed. 50% means it’s running at half speed.
You can use all the standard tools to trim the clip and thus create any speed you like. Depending on your hardware, you may have to render the effect to see it play properly. That’s a disadvantage, but the old motion effects had to be rendered, too.
There is one surprise, though. Since trimming the clip changes its speed, if you really do want to trim it, you’ll have to remove the effect, make your trim, put the effect back and readjust the speed.
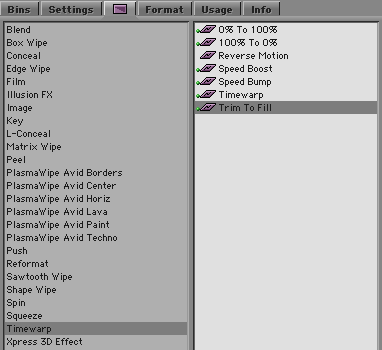
Trim to Fill is a subset of the “Timewarp” effect. The full timewarp option allows you to ramp your speed changes, gradually speeding a shot up or slowing it down. But it isn’t needed in most cases. Avid also offers other timewarp presets including a reverse motion effect and a 50% slow motion effect.
Note that even the simplest effect created as a timewarp looks smoother than the equivalent effect made the old way. That’s because timewarps do “motion interpolation,” creating additional frames as needed to smooth things out. If you make an old “print every frame twice” effect and compare it to a 50% timewarp, you’ll see the difference instantly.
Explore posts in the same categories: Avid Technical Tips
October 3, 2007 at 2:02 am
great tip. i’m still looking for a timewarp tutorial outhere and can’t find any. any ideas? thx, dom
June 1, 2011 at 2:27 pm
Hey man. Thanks for the tip. In FCP you can do this the same way but you have control over ease in and ease out. Can this be done in Avid use trim to fill? I’ve tried using the motion effect editor but it doesn’t seem to recognise the speed change on the clip in the timeline? Your 2 cents?
July 17, 2011 at 2:04 pm
You can add keyframes in the position graph, which would make changes but keep the first and last frame where they were based on your trim. But using the position graph isn’t for the faint-of-heart. Another way would be to get speed you like via trimming, take note of it, remove the trim-to-fill, replace it with a regular timewarp, set it to that speed, and then make adjustments from there. Not exactly elegant, but it would probably get the job done.