Archive for the ‘Avid Technical Tips’ category

Audio Keyframe Features in 6.5 — Video

October 19, 2012

Avid has just released a video describing the new audio keyframe features in MC 6.5. It’s concise, well-produced, very informative and blessedly free of the marketing hype that you sometimes see in productions like this. For me, you don’t need any more reason than this to upgrade.

Advertisement

Upgrading Without Tears — Moving from MC4 to 5

September 27, 2011

I received an email from an editor recently, a long-time Avid user, which started more or less like this: “I’m using MC5 on a TV series. But I really don’t like it. And the other editors on the show all have the same impression.” He went on to explain how much he dislikes the FCP model and prefers Avid’s trim tools, especially asymmetrical trim. But MC5 removes much of the fluidity that he loved in older versions of Media Composer.

My reaction is that while MC5 felt different, Version 5.5 brings back much of the feel of Version 4. The trick to making it work is, naturally, in your settings. If you adjust things properly, you will find that 5.5 functions pretty much as you expect, and offers several important new features, including real-time audio effects, stereo tracks, and the ability to search the entire project for clipnames or descriptions (or anything else, for that matter). If you pay an extra fee, you can search for audio dialog, as well (PhraseFind).

Here’s what you need to do.

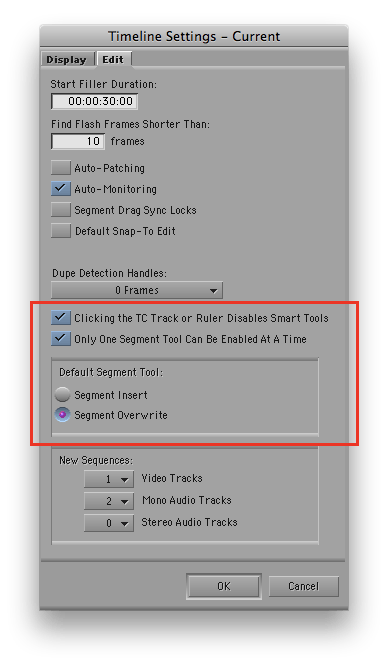
1) Timeline Settings

Be sure to select “Clicking the TC Track or Ruler Disables Smart Tools.” That brings back traditional behavior — click the timecode track and segment mode turns off. Over time you may find that you prefer this to be turned off, but if you want familiarity, leave it on. Selecting “Only One Segment Tool Can Be Enabled at a Time” also makes MC5.5 work like Version 4 — when you choose Red or Yellow Segment mode, the other turns off. And finally, your default segment tool should be “Overwrite.” I could go on at length about this, but if you want fewer surprises, use Overwrite. Note that all these settings are not this way by default — that’s a big part of why long-time Media Composer users get so frustrated with v5 and 5.5.
2) Smart Tool

Start by turning off the Linked Selection button. For long-time users, this single feature is probably responsible for more frustration than anything else. Turn all the Smart Tools off. In Version 5.5, they’ll stay off. Turn on the keyframe tool — when you move your cursor over a keyframe you’ll be able to adjust it.


3) Keyboard

Be sure to put both segment mode buttons on your keyboard. When you need to move a clip, just hit the mode you want. I also like to put the waveform toggle on the keyboard (“Wa” in the illustration).


4) Trim Mode

Nothing special to be done here. But important changes in Version 5.5 bring back the responsiveness and precision that you were used to in Version 4 when selecting rollers. And it fixes the bug that took you out of Trim Mode if you accidentally clicked too far away from a roller.


5) Composer Settings

Be sure to de-select “Auto-enable Source Tracks.” This brings back the MC4 feature that remembered source track selection. Again, it is selected, rather than deselected, by default (see this post).

6) Keyboard Shortcuts

Yes, some of the keyboard modifiers and shortcuts have changed. It’ll undoubtedly be frustrating initially, but it’s not the end of the world. These are the ones you’ll need most often.

  1. To drag a segment vertically while allowing no movement side-to-side, use Command-Shift-Drag.
  2. To enter Slip and Slide from Trim Mode, get into Trim Mode any way you like, then double-click an existing roller to slip, double-click again to slide.
  3. To lasso transitions and clips anywhere in the timeline, hold down the Option key (rather than the command key) and drag.


7) Other Shortcuts

  1. To set the start timecode for a sequence, simply make a change in the Start column for that clip in a bin. Or right-click on the sequence in a bin and select “Sequence Report…” (You can also use this option to create a list of all effects in the sequence.)
  2. To measure a group of clips or sequences, select them, then right-click on one of them and choose “Get Bin Info.” The Console window will open, with a total length listed.


8) What’s Next?

Once you’ve got all these things set up, MC should feel pretty familiar to you. After that, you’ll want to explore some of the new features. Start with the Track Control Panel, where you can add real-time audio effects. Keep in mind that you can’t change an effect internally — it stays constant throughout your sequence — but it can still be very useful for many things, such as adding a ring-out in music. You can also turn waveforms on or off on a track-by-track basis. In addition, MC5 lets you create and use stereo tracks and clips, so you can treat a stereo pair as a single object in the timeline. You’ll also want to check out the new Find features (Command-F). They let you to search throughout your project. And you’ll need an introduction to Advanced Keyframes, which are now used for most effects. They’re much more powerful, but they take some getting used to. You can find all of that and more in my book, Avid Agility.

Remembering Track Activation

September 17, 2011

In the days of mono Nagras, production mixers mixed their mics into a single audio track. But multi-track digital recorders have made that idea seem quaint, and today, editors typically cut from two-track source clips (if not from four- or eight-track clips). Through version 4, Media Composer helpfully remembered source track activation. Which meant that if you loaded a particular clip into the source monitor, selected track 1 for editing and deselected track 2, when you came back to that clip at some point in the future, those tracks would still be highlighted, ready for your next cut.

In version 5, that feature broke. Reload a clip and all tracks were automatically highlighted. No memory.

I recently learned that the feature returned in MC5.5 — but only via a setting. It’s called “Auto-enable Source Tracks,” available in the Edit tab of Composer Settings. It’s enabled by default — which turns off activation memory. If you want your source track selection remembered, be sure to disable it.

Also note that changing track activation does not trigger an autosave. You must do something else to the relevant bin (make a mark or move a clip, for example) to ensure that the track status gets saved.

For more tips like this, check out my book Avid Agility, available in print or for Kindle, from Amazon.

Dealing with Big Monitors

September 6, 2011

This is a little one, but it’s made an outsized difference to my work. Some of you are undoubtedly cutting on laptops, but for those sitting in front of a couple of 24″ screens, a common complaint is that so much screen real estate makes it easy to lose track of the mouse cursor.

Though many people don’t seem to be aware of it, you can easily change the cursor size with an OSX control panel. Go to System Preferences > Universal Access > Mouse and Trackpad Tab. You’ll see a Cursor Size slider. Bump it to the right and your cursor will get a whole lot easier to locate. It’ll look a bit more aliased, but that’s a small price to pay for greater usability. (You can do the same thing in Windows with the Mouse Control Panel.)

For more tips like this, check out my book Avid Agility, available in print or for Kindle at Amazon.

Real-Time Freeze Frames

August 14, 2011

The traditional way to make a freeze frame in Media Composer is with the Freeze Frame menu pick. You park on a frame in the source monitor, match back till you’re looking at a master clip, then select Clip > Freeze Frame and choose a length. This generates a clip of the frozen frame and media for it. You can then cut it anywhere you want.

But there’s an easier way — using the Timewarp effect. Instead of creating a clip in the source monitor, you apply the effect in the timeline and make a speed adjustment from 100% to 0%. The trick is to specify your keyframe type — to create an instantaneous change rather than a ramp.

First, identify the frame to freeze and add a locator so you can find it easily. Then drag the Timewarp effect to the clip, park on it, open the Motion Effect Editor, and display the Speed Graph.

Move the position indicator to your frame and add a keyframe. Then —  and this is the crucial step — right-click on the speed graph and select “Shelf.”

Enter a speed for your new keyframe — 0%. The result is a speed graph with a hard right angle at your keyframe — an instantaneous change from normal speed (100%) to a frozen frame (0%).

That’s all there is to it. Keep in mind that this is a real-time effect. It typically won’t require rendering, and you can overlay other effects on top of it. Because it’s real-time, it’s easy to change. If you prefer a different frame, just open the Motion Effect Editor and move your keyframe. (To ensure that you don’t change the speed, hold down Option and Shift while you drag.)

For more tips like this, check out my book Avid Agility, available at Amazon.

New Tools for Music Editing

August 5, 2011

Avid’s new stereo tracks and Real Time Audio Suite effects are both liberating and frustrating. Introduced in Version 5, stereo tracks allow editors to handle stereo pairs as single objects in the timeline, and control them with a single set of audio keyframes. RTAS effects let you apply up to five real-time audio filters to each track, quickly and easily. That’s the good news. The bad news is that you can’t automate these effects in any way — you can’t turn them on and off, and can’t change their values, anywhere within a sequence. Nor can you edit them from one sequence to another — you have to copy to a bin first.

Stereo clips are problematic, too, because they can only reside in stereo tracks. You can’t put a clip wherever you want, you have to dedicate a track to these clips, again, throughout your show. Meaning that if you have only a few such clips, you’re wasting a whole track for them. And since Media Composer only plays 16 tracks, a couple of stereo tracks — each equivalent to two mono tracks — can waste resources big time.

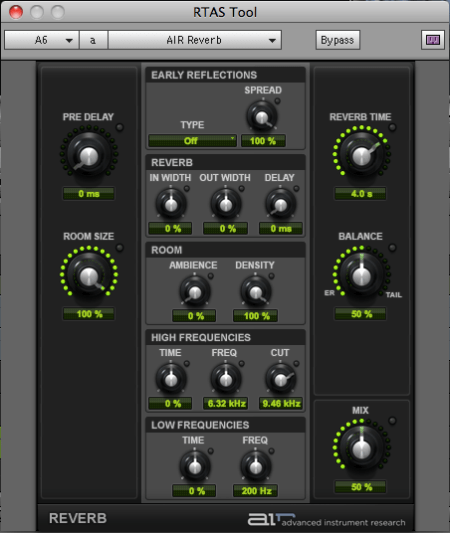
But despite these limitations, I’ve been using both features to good effect, mostly for editing music. The technique I’ve come up with is to dedicate two stereo tracks to temp music, and one to reverb. That’s right — a whole track to reverb — the same reverb throughout the show. For picture editors used to conserving track space, this seems almost absurd, but once you’ve wrapped your mind around it, it can be effective. End your music wherever you want, then cut the last beat to the reverb track. Voila — you’ve created a ring out. (In some cases, you’ll need to add short dissolves or fades to smooth out the transition.) Avid’s new AIR reverb plug-in, included with MC 5.5, is particularly good for this purpose. Unlike the old D-Verb, AIR reverb is more easily controlled and sounds better. You can simply set a duration (Reverb Time), measured in seconds. You’ll also want to adjust the Mix parameter, which controls how much of the original, dry audio is combined with the reverb (50% is a good starting point).


Avid could make some improvements to this situation. Automation for RTAS is essential. Likewise, the ability to edit RTAS effects when cutting from one sequence to another. And the AIR plug-ins, good as they are, include presets in Pro Tools, which are missing in MC. Finally, if we’re going to segregate stereo and mono clips into specialized tracks, then we need more tracks — 24, at least.

For more tips like this, check out my book, “Avid Agility,” available from Amazon.