Archive for the ‘Audio’ category

New Tools for Music Editing

August 5, 2011

Avid’s new stereo tracks and Real Time Audio Suite effects are both liberating and frustrating. Introduced in Version 5, stereo tracks allow editors to handle stereo pairs as single objects in the timeline, and control them with a single set of audio keyframes. RTAS effects let you apply up to five real-time audio filters to each track, quickly and easily. That’s the good news. The bad news is that you can’t automate these effects in any way — you can’t turn them on and off, and can’t change their values, anywhere within a sequence. Nor can you edit them from one sequence to another — you have to copy to a bin first.

Stereo clips are problematic, too, because they can only reside in stereo tracks. You can’t put a clip wherever you want, you have to dedicate a track to these clips, again, throughout your show. Meaning that if you have only a few such clips, you’re wasting a whole track for them. And since Media Composer only plays 16 tracks, a couple of stereo tracks — each equivalent to two mono tracks — can waste resources big time.

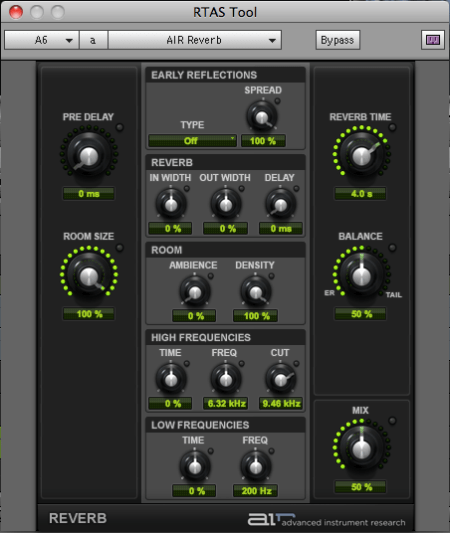
But despite these limitations, I’ve been using both features to good effect, mostly for editing music. The technique I’ve come up with is to dedicate two stereo tracks to temp music, and one to reverb. That’s right — a whole track to reverb — the same reverb throughout the show. For picture editors used to conserving track space, this seems almost absurd, but once you’ve wrapped your mind around it, it can be effective. End your music wherever you want, then cut the last beat to the reverb track. Voila — you’ve created a ring out. (In some cases, you’ll need to add short dissolves or fades to smooth out the transition.) Avid’s new AIR reverb plug-in, included with MC 5.5, is particularly good for this purpose. Unlike the old D-Verb, AIR reverb is more easily controlled and sounds better. You can simply set a duration (Reverb Time), measured in seconds. You’ll also want to adjust the Mix parameter, which controls how much of the original, dry audio is combined with the reverb (50% is a good starting point).


Avid could make some improvements to this situation. Automation for RTAS is essential. Likewise, the ability to edit RTAS effects when cutting from one sequence to another. And the AIR plug-ins, good as they are, include presets in Pro Tools, which are missing in MC. Finally, if we’re going to segregate stereo and mono clips into specialized tracks, then we need more tracks — 24, at least.

For more tips like this, check out my book, “Avid Agility,” available from Amazon.
Advertisement

Keeping Your Client Monitor in Sync

September 15, 2010

If you’re using an HD TV as a client monitor, you’re probably familiar with the dreaded “out-of-sync-on-the-big-screen” problem. This is the result of the fact that most consumer-level TVs introduce a video delay —  the time it takes the TV’s video scaling hardware to do it’s job. If you use the same TV at home, you’ll be listening to audio through the TV — and the TV contains hardware that delays the audio, as well, and keeps you in sync. But when such a TV is used in an editing room, audio is typically run through a mixer and big speakers and isn’t delayed. The result is a sync problem on the TV — the Avid’s composer window looks good, but the on the big screen audio is advanced relative to video, often by as much as two frames and sometimes more. What to do?

You typically have two choices: run your audio through the TV and then back out to your speakers, or purchase and use an audio delay box. Neither approach is ideal: running audio through the TV is awkward, limits you to two tracks, and may degrade quality, and delay boxes are fairly expensive.

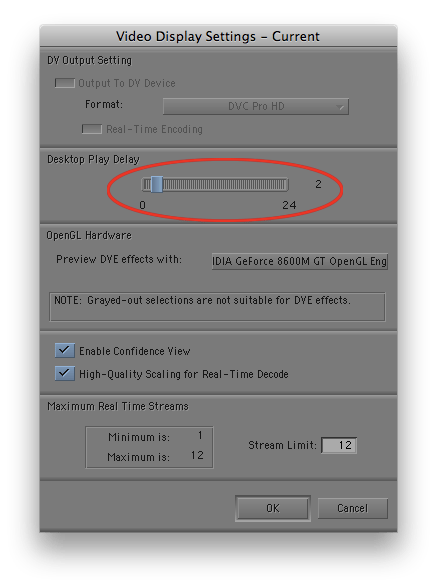
But there’s a third alternative that I discovered recently: Avid’s Desktop Play Delay setting. It was designed for output to a DV device where video and audio are delayed by the latency in the device. But it can also work effectively to put your Avid audio in sync with a client monitor. Just select a frame offset in the setting panel: the number of frames you enter is the amount audio will be delayed. You’ll have to experiment a bit to get it right: on our LGs, a two-frame delay seems best.

Sadly, you can’t be in sync on both the Composer window and the big screen, so you’ll have to choose — no delay for perfect sync on the Composer, or your preferred offset for perfect sync on the client monitor. I tend to leave the setting at zero when I’m working alone, but make the adjustment when I have people in the room, or when we’re screening. Also note that because this feature was designed for DV, it  causes video to jump when you press play or stop, by the number of frames you’ve selected. That’s not a show stopper, but it’s another reason to set the delay back to zero for the bulk of your work. There’s another quirk, as well: You can’t create two settings panels, one with an offset and one without, and then switch between them. For some reason, whatever you do to one panel affects the other.

But despite these problems, the Desktop Play Delay setting has solved a big problem in my cutting room. And if video didn’t shift on play and stop, I might leave it on all the time.

Media Composer 5

April 11, 2010

With NAB starting this weekend, Avid has announced Media Composer Version 5. You can get a quick rundown on some of the new features, here and here. Without doubt, this is Avid’s biggest upgrade in years and includes many fundamental changes to the editing model, along with a host of new features.

The short list includes:

  • AMA support for Quicktime, for native Red R3d material and Canon DSLR media — meaning that you can play and edit these files without importing them.
  • Super low cost HD client monitoring via the Matrox MXO2 Mini (about $450).
  • Direct manipulation of clips and transitions in the timeline. Click a transition to get into Trim Mode, click a clip to get into Segment Mode. Click the top of a clip for red segment mode, click the bottom for yellow segment mode.
  • Linked selection — select video and the associated audio is selected at the same time.
  • Stereo audio tracks and clips — a stereo pair can be treated as one object with one set of keyframes.
  • Support for real-time Audiosuite plugins.
  • The ability to mix and match clips with different aspect ratios in the same timeline. Tell the MC how you want each clip presented via a bin column (pillar/lettter box, stretch, etc.)
  • A “paging” timeline — when you play off the right edge of the timeline, it jumps forward, so you are always seeing the blue cursor. (This alone is a reason to upgrade.)
  • Dupe detection now works across all video tracks.
  • The ability to import AVCHD video.
  • Support for RGB colorspace in HD.

Not too shabby for one release.

And, in a separate announcement, Avid reported a deal to buy Euphonix, maker of advanced mixing consoles. The press release is here. Key sentence: “Avid plans to further develop an open standard protocol that greatly expands the ecosystem of compatibility between the Euphonix control surfaces and a wide range of Avid and third-party audio and video applications, including Media Composer and Pro Tools.”

MC Audio Dissolves Come in Two Flavors

January 13, 2010

Have you ever created an audio dissolve and heard an audible volume dip in the middle of the effect? Perhaps when you’re trying to join two similar pieces of fill? If it’s happened to you, you know how maddening it can be to eliminate. Final Cut offers a neat solution: two kinds of audio dissolves, one of which raises the level in the middle of the effect by 3 db. Audio editing applications typically permit even more choices.

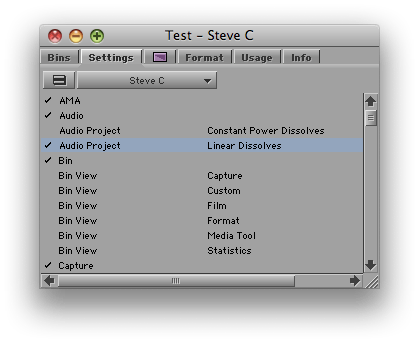
It turns out that the Media Composer offers a choice of dissolve types, too. But the feature is hidden in a setting and barely mentioned in the docs. I had thought it altered all dissolves, including the ones you’ve already made. But in fact, it affects new dissolves only; old ones are left alone. The setting is labeled “Dissolve Midpoint Attenuation.” You’ll find it in the Effects tab of the Audio Project settings panel. Similar to Final Cut, your choices are Constant Power, which adds a 3 db boost in the center of the dissolve, and Linear, which is the default.

The trouble with this implementation is that it’s hard to quickly alter an existing dissolve and compare options. And you have no indication in the timeline of the type of dissolve you’ve created. FCP allows you to change a dissolve type with a contextual menu pick, and it labels each effect in the timeline.

But while not ideal, in practice you can make the MC method work. Simply duplicate your Audio Project setting (select it and hit Command-D). Then open each setting by double-clicking, adjust one to be Constant Power and the other Linear, and name them appropriately. Once you’re created these settings, you can quickly switch between them by clicking in the area to the left of the setting name (putting a check mark there).

You probably want to let Constant Power be your default. For most dissolves, it’s more likely to produce a smooth transition. For fades, you may prefer the Linear setting.

I’m wondering whether readers here have used this feature. It was a new for me and I’m curious whether you’ve tried it and how it’s worked in practice. Please share your impressions in the comments.

Collapse the Composer Window

November 13, 2009

I explained in the last post how you can hide the Source Monitor, but you can also collapse the  Composer window, hiding video entirely and showing only buttons, menus and tracking information. This can expand your screen real estate mightily, making room for a much-enlarged timeline with plenty of room to manipulate audio keyframes and see waveforms. If you’ve got a client monitor, you’ll view video there.

mini-composer-2

This view was once called the “mini-composer.” To invoke it on a Mac, simply hit the the green “+” button at the top left of the Composer window. Or right-click on a video image and select “Hide Video.” To go back to your regular Composer view, hit the plus button again or deslect Hide Video.

You can do anything in the mini-composer that you could do in the regular composer. Trim mode is available, for example, and works as you’d expect. You can even drag from a bin to the source or record monitor. Just drop your clip onto the mini-composer window.

Of course, you wouldn’t work this way all the time, but for audio work, it can be very useful. I make it part of my Audio Toolset. (For more about Toolsets see this video post.)

24-fps Turnover to Sound

March 21, 2009

same-as-source-qt-export1In the old days, film shows turned over to sound via videotape and OMF. That meant sound got a 29.97 version of a show that was cut at 24, complete with the 3/2 telecine-style cadence inserted. It was an awkward and slow hand-over for both picture and sound.

Today, though most shows no longer deliver tapes to sound, many still create 29.97 Quicktimes, often for no better reason than, “it’s what we’ve always done.” But if you’re working on a 24-fps show, the easiest and simplest way to turn over is with 24-fps Quicktime.

Why are 29.97 QTs problematic? First, because creating a 29.97 QT from a 24 or 23.976 fps project doesn’t just mean introducing 3/2 — it means duplicating frames. That makes it awfully hard to cut sound effects precisely. Second, 29.97 QTs take a long time to make, wasting hours that picture assistants don’t have.

But if we turn over 24-fps Quicktimes, what settings should be used? And how should sound handle it in Pro Tools?

I’ve spent several days hashing this out with a music editor friend. I made a simple sync test: a head and tail leader with sync pops, separated by three minutes of filler and overlaid with an Avid Timecode Burn-In effect. From this I exported Quicktimes and OMFs, which my friend imported into PT. Then he added his own counters, compared them with mine and checked the pops. A pulldown sync error is about 1.5 frames per minute, so at the end of 3 minutes, if we’d screwed up, he’d be out by over four frames.

The whole thing is complicated by the fact that the Media Composer allows you to work in two kinds of 24-fps projects: “23.976p” and “24p.” The 23.976p project works like digital videotape. The 24p project works like film. (For details, see the post, Clarifying Avid Project Types. To figure out what kind of project you’re working in, go to the Project window and select the Format tab.)

Either way, you should select “Current” frame rate when you make your Quicktime. This will produce a Quicktime that is frame-for-frame identical to what you’re seeing in the Avid. (In a 23.976p project Quicktime will display a frame rate of 23.98, in a 24p project, it will display 24.)

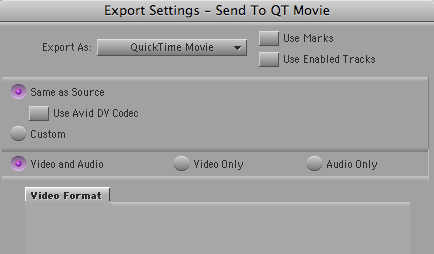
Choose any codec that you and your sound editors prefer. But consider using the Avid codec. That’ll produce the fastest QT conversion, and your sound editors will see exactly what you saw in the Media Composer. You won’t need to fool around with Quicktime export settings, either. Just select “Same as Source” in the Quicktime Export dialog and you’re all set.

To play these QTs, your sound editors will need to install the Avid codec. Many sound editors don’t have this, but it’s a trivial download and a simple install. You’ll find the codec here. (Avid really ought to make it easier to find.)

In Pro Tools, your sound or music editors will work as follows: If you are working in a 24p project, they’ll run picture and timecode at 24-fps. If you’re working in a 23.976p project they’ll run picture and TC at 23.976. Either way, they’ll play back audio at 48K (or 44.1 in the unlikely event that you’ve been working that way in MC).

That’s all there is to it. If you take the time to create a test like I did (always a good idea), your sound editors will see the tail pop from your OMF line up with the tail sync mark in your QT, and their TC counter will line up with yours. They’ll see exactly the same frames you did in the Media Composer, and your exports will be quick and relatively foolproof.