Tip #8 – Cut and Paste in the Timeline
This won’t be news to some of you, but over the years Avid has made it easier to cut and paste clips in the timeline. Not everybody is aware of this feature and it may appear quirky, but in certain situations it can be a godsend. For example, if you need to make a series of similar titles, just make one and copy and paste it where you want the others. Then simply change the text on the copies. All the formatting remains intact.
Here are a few pointers:
Copy obeys tracklights and marks. So first select the tracks you want to copy, then mark the timeline where you want the copy to start and end. Then select Command-C. The material you’ve marked goes to the clipboard.
But paste (Command-V) doesn’t obey marks or tracklights. When you paste, whatever was in your clipboard is inserted at the blue bar position, regardless of where your marks are, and in the same track(s) from which it was copied. A paste typically works like an insertion, a yellow edit. That generally isn’t as useful as an overwrite (red edit). To do that, you must select red segment mode before pasting.
If you want to paste copied material into a different track, you have to put your copy into the source monitor, patch your tracks, and insert or overwrite. In Media Composer the easiest way to do this is by selecting “Clipboard Contents” from the menu above the source monitor.
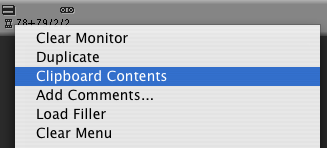
Xpress doesn’t include that menu item so you must use the command palette to do it. The button is in the Edit tab and is called “Clipboard Contents.” Put it under your source monitor and click it to load whatever you’ve last copied.

Even simpler, you can copy something from the timeline directly to your source monitor simply by marking it, selecting tracks and then option dragging from the record monitor to the source monitor. Voila, you’ve got a copy of that material, ready to be edited somewhere else. But note that this feature broke at some point and could corrupt your timeline. I’m told that it’s fixed now, but you should use it at your own risk.
Finally, note that every time you lift or extract something, a copy of the material automatically goes to the clipboard. If you want to use it somewhere else, just paste it directly or load it into the source monitor.
______________________________
Wish list:
- In most Mac applications, including the Finder, you can duplicate an item by option-dragging it. A copy is created wherever you end the drag. Pro Tools allows you to do this in the timeline, and sometimes it sure would be great if the Media Composer did, too.
- Allow the editor to choose the type of edit a paste defaults to. I almost never want an insert. I almost always want an overwrite.

December 5, 2006 at 8:07 pm
Another one you might want to try is to mark your tracks and timeline and then Alt/option copy (Command-C / Control-C), that will also send it straight to the Source monitor without having to drag it into the source.
May 27, 2012 at 8:07 pm
Reblogged this on Uttarakhand Cinema.
September 4, 2014 at 4:15 pm
What a stuff of un-ambiguity and preserveness of valuable experience concerning unexpected emotions.