Tip #10 – Combining Versions
One of the trickiest things editors have to do every day is manage versions. I always try to keep one ‘hero’ sequence clearly identified. If I’m not sure about a change, I’ll experiment with it in a shorter sequence and call that an ‘alt.’ Then I can compare the master with the alt, either for myself or for a director or producer.
If I decide that the alternate is an improvement, I have to integrate it into my master sequence. Here’s a trick that uses Avid’s “match frame edit” marks to make that easier. (These marks are modeled after the old “through” marks that we once put on film with a grease pencil — two parallel lines marked across the splice would indicate that it was unintentional.)
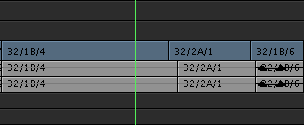
First, put your master version in the record monitor and your alt in the source. Here’s the master:
And here’s the alt. Note that two shots have been deleted.
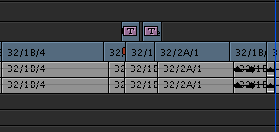
Our first step is to mark two frames, one before and one after the change, where the alt and the master match each other. We mark in on a frame before the changed area and mark out on a frame after it. We mark the exact same frames in the source and the record, two marks in each, for a total of four marks. I prefer marking on “zero frames” where the frame count equals zero. That’s not strictly necessary but it makes it easier to keep all this marking straight.
Here’s the source monitor with both marks indicated:

Here’s the record monitor with the same frames marked.

Now we’re ready to make the replacement. First check your patching. Everything should go straight across. You don’t want to be moving material from one track to another. Then simply hit extract (the scissors) and insert (the yellow edit button). The old material is deleted and the new material is inserted. This is what the timeline looks like after the insertion:
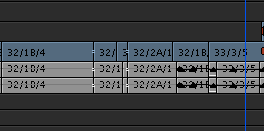
Note the unintentional splice marks. That’s the key. They prove that you did the replacement correctly, that the new material dropped in at the right place and the cut points matched up. If you don’t see those marks in every track, you’ve made a mistake. Undo twice, check your marks and try again.
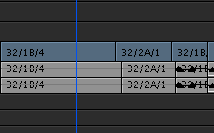
All that remains is to remove the unintentional splices. The easiest way is to lasso them and hit the delete key. Voila, your master version is up to date.

December 31, 2006 at 7:10 pm
Control/Match Frame is useful for finding the same frame on the record sequence.
January 2, 2007 at 5:57 pm
Yea — that saves a step. Nice.