Multi-format Timeline Gotcha
As you all know, I’ve been experimenting with animated titles created in Motion and imported into the MC. And yesterday I got hit with a new and arcane gotcha, shortly before a big screening (of course).
I’ve been importing the Motion titles at 1:1, even though my project is 14:1. This creates cleaner keys. The Media Composer has been happy to play these 1:1 titles without rendering — until we built the individual reels of our show into a long sequence. That’s when the titles started freezing. Nothing we could think of would solve the problem. The titles played fine in a shorter sequence. But once the timeline got to be over an hour or so, they’d freeze and stutter. Rendering the titles didn’t make any difference.
An hour of experimentation produced no improvement. Restarting the machine and the DNA, rebuilding the media database on the render drive, re-rendering to another drive, recreating the sequence — nothing helped. After a lot of adrenaline (of the biological kind), and with the hour of our screening rapidly approaching, we finally figured out what was happening — thanks to the insight of Josh Rizzo at Wexler. Even though our project was 14:1 and we thought we were rendering at 14:1, those titles were being rendered at 1:1. And thus playing them, even in their rendered state, still meant using the MC’s real-time multi-format capabilities. And it was those capabilities that were choking on the long timeline.
The solution is in the Media Creation settings, under the render tab. Even though you’ve selected “14:1,” there’s a checkbox that tells the system to render effects at the resolution of the underlying source. There’s no explanation for the meaning of this setting — and it’s checked by default — so we’d left it alone. Here’s the setting dialog. Be sure you de-select the circled checkbox.
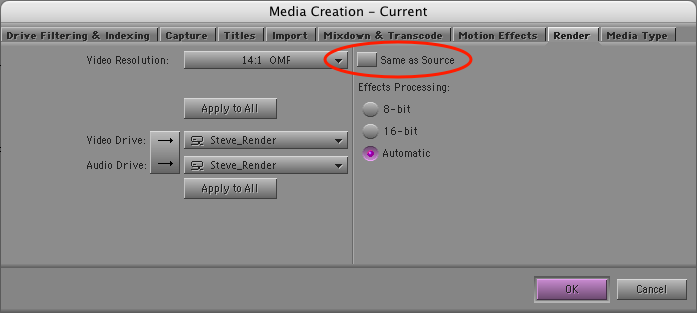
With “same as source” deselected, I re-rendered the titles. And voila! — they played fine, no matter how long the timeline was, because now they were rendered at 14:1. This didn’t seem to hurt the quality of the titles much. The effect isn’t nearly as severe as bringing them in at 14:1 in the first place. (But I’ll be doing more experimentation with this in the future.)
Bottom line — watch out for that multi-format timeline. It’s wonderful when it’s working, but when it chokes, figuring out what happened can be awfully confusing.
Technorati Tags: edit, film, video
Explore posts in the same categories: Avid Technical Tips
April 5, 2008 at 10:13 pm
Nothing like those very hidden options with very hidden documentation to trip you up. Always nice to have a team of people working on this, as SOMEONE is bound to figure it out. Which I am glad you did.
April 6, 2008 at 3:02 am
This is precisely how I work – gfx come in 1:1, SAS render setting off, so all renders happen at 14:1p. Pretty much every tool and setting in MC can be right clicked on for a direct link to the help page – one of the many great overlooked features of MC.
Feel free to email me if you come across other issues, since having read your blog for a while now it seems we run very similar project setups.
April 6, 2008 at 3:03 am
This setting is neither hidden nor does it have “very hidden documentation”.
April 6, 2008 at 6:34 am
Mark, thanks for your comments. It’s not hidden, but there’s no explanation for what “same as source” means or, more important, for the fact that it OVERRIDES the setting right next to it. Based on the graphical treatment, it would seem to modify the “graphics processing” choices. It’s also set to “on” by default, which has a fairly profound effect, namely that even though you’ve rendered an effect, it will still play using the real-time engine. What threw us was the fact that the effect no longer had a green dot — and it still wouldn’t play. For years, we’ve learned to render something if it won’t play. Seeing something rendered and not playing was pretty disconcerting.
Maybe Avid should add a new dot color that indicates that your media is not the same as the project setting and will be converted in real-time. That would have clarified what was happening.
And the Media Creation settings could be cleaned up. They certainly confused me the first time I used them. “Same as Source” could be explained better — yes, it’s explained in the help, but there’s plenty of room for some explanatory text right in the dialog. And the “Media Type” tab should be in first or second position in the tab row, since it modifies all the other tabs.
April 6, 2008 at 10:19 am
As an alternative, Steve, to your recommendation, I think that an optional dialog box which states that certain identified pieces in your timeline are at a different resolution than the project, would be great right before a Digital Cut or a render.
April 7, 2008 at 9:05 am
Could showing Clip Resolution Text on the timeline have helped?
But while we’re on the subject, why does the “Effects Source Disk” still show up as the default render destination for the first render of the day rather than take the MEDIA CREATION setting as default?
I realise that in the days of old striped SCSI drives having the renders distributed amongst the drives made realtime play back more likely, but why have the Media creation settings if the temptation to accept the effects source disk is still there?
Or am I missing something.