Taking Work on the Road
Many of us have been sorely frustrated by how difficult it is to pack up media for work on the road. In a typical situation you want to take a scene or a couple of scenes home and work on them on a laptop. You don’t want all the media for your show, just a small subset. You need to identify all the media for a specific bin and copy it to a portable drive.
The old and slow way to do this is to reveal file on each of your master clips and then copy those files in the Finder. It’s a laborious process and easy to screw up.
But it turns out that there’s a much easier way. It’s hidden, but when you know how to set it up it does what you want with a lot less work. It’s under the Export menu.
Open the bin you’re interested in. Select all your source clips — master clips, subclips or groups. No need to find the source master clips.
Then select Export from the File menu.
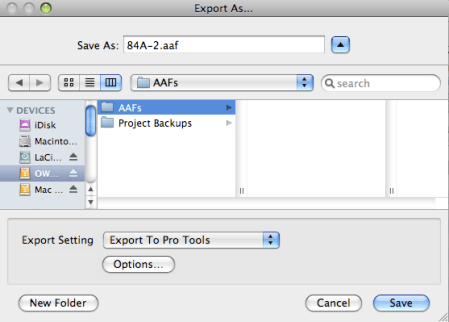
Start by selecting an export setting. The easiest place to begin is with “Export to Pro Tools.” Then click the options box.
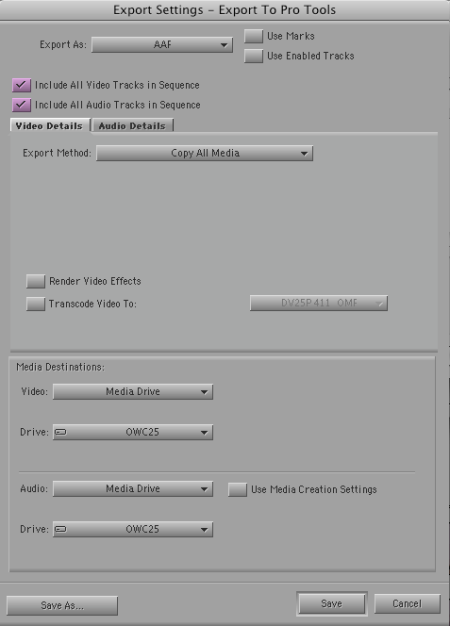
Here’s where things get counter-intuitive. For “Export As:” select AAF (or OMF). You have to make an AAF for every clip. You won’t need these files, but the MC insists on creating them. To keep them organized, ceate a folder on your export drive for them.
Then select “Include All Video Tracks in Sequence” and “Include All Audio Tracks in Sequence.” This is true even though you aren’t exporting a sequence at all.
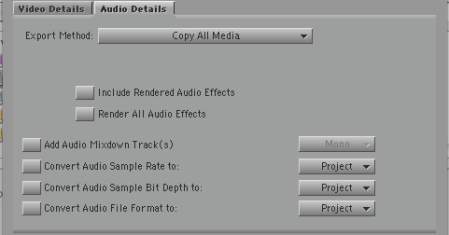
In the audio and video tabs, select “Export Method: Copy All Media.” This is the crucial step. You’re not consolidating — just copying. If you don’t, you’ll create a bunch of “.new” clips. Leave all other options unchecked. Select a destination drive (a “media drive” not a “folder”) for both video and audio.
Here’s the video tab:
And the relevant part of the audio tab:
When you’ve got your options set up correctly, hit Save and then select Save again in the Export dialog.
A new MediaFiles folder will be created on your target drive and the MC will copy all relevant media to it. The folder you made to hold the AAFs will get an AAF file for every source clip. You won’t need those files and, for reasons that will be clear in a moment, you probably want to delete them.
You’ll have to copy the bin (or bins) you need to your laptop manually, but that should be easy. It will automatically link to the new media — no relinking needed. (I’m told that on PC-based systems you may have to delete your media databases on the portable drive.)
One nice additional feature is that in the future, if you add a material to a bin and need to export the media again, the MC will intelligently decide which files already exist on your external drive and will copy only those that aren’t already there. And that’s why it’s handy to delete your AAFs/OMFs. If you leave them alone, the MC will ask to overwrite them, one laborious file at a time, and you’ll have to confirm a separate dialog box for each clip. It’s much easier to have the MC recreate them all.
This process isn’t exactly intuitive, but it’s easy to do once you know a few tricks. It should make it a whole lot easier for editors to take work on the road.
Technorati Tags: avid, edit, film, video
Explore posts in the same categories: Avid Technical Tips, Laptop Editing


November 12, 2008 at 8:03 am
Great tip. I’ve been editing with Avid for years wondering why there wasn’t a better (less messy) way to simply identify and copy selected media files between systems without creating a mess inside you bins. Goodbye .new and .old!
November 12, 2008 at 8:29 am
Great tip!
November 12, 2008 at 9:05 am
Great tip!
When you say you have to copy the bins to the drive manually, do you mean copy the MC Project file to the external drive (the Project file also contains the .avb files)?
November 12, 2008 at 9:37 pm
Not the whole project — just the bins you need. Every bin file ends in .avb.
November 17, 2008 at 3:03 pm
Thank you.
Now if only I knew how to export only the audio tracks to an external drive so they can be sent on to another Avid machine so that the audio tracks remained separate (rather than mixed down). I’m sure there’s some Pro Tools export that would do this. I haven’t figured it out yet, however.
November 18, 2008 at 8:57 am
Uh…now that I think about it. Your technique described here is exactly what I would need to solve my problem I raise immediately above. Duh.
November 19, 2008 at 2:32 am
amazing tip iam working with AVID fast 8 years but i dont know thank you for ur great tip
November 19, 2008 at 9:29 am
I’ve been using this for a while now and its a great time saver for both packaging up media for editing or turning over to a sound department.
When going Avid to Avid we have a problem though with rendered audiosuite effects particularly the time compression ones; if you don’t include the render and it has been trimmed shorter, re-rendering at the other end leaves a blank gap at the end of the clip where there was no original audio in the trimmed clip.
So can anyone confirm that ticking the “Include Audio renders” would copy both the original media and the rendered media?
We’ve done it with showing Render files in Bin and revealing mediafile but to do an entire sequence at a time would be great.
December 20, 2008 at 4:08 pm
Thanks Steve! This is much easier that the consolidate method I was using. But I did need to rebuild/reindex the media file databases.
What will happen to sequences I create which reference these clips which now point to my portable drive? Will this be a problem if I try to open them up using the bins on the workstation in my office? Will it just be a matter of relinking?
— Larry
December 20, 2008 at 4:31 pm
There shouldn’t be any relinking needed, at least not on a Mac. It’s essentially an automated finder-level file copy — as long as you use the settings described above. No “.new” clips, and media files with the same names. The only problem is a) how unintuitive the whole thing is, and b) the fact that you have to make a bunch of AAF files that you have no use for.
March 21, 2012 at 8:23 am
Hello there! I just want to offer you a big thumbs up for the excellent info you have here on this post. I will be returning to your website for more soon.
May 9, 2012 at 4:53 am
If I just copy the bin files (not the project), how can I open the project?