Sync Locks and Why You Need Them
I’ve noticed that a lot of people don’t turn sync locks on in the timeline. That seems like a shame to me. In the old days this feature was buggy and many people ended up avoiding it. But now I leave them on all the time. The reason is simple — sync locks allow you to make complex trims on multi-track sequences all day long and still be in sync when you’re done.
Specifically, it means that when you’re trimming, you can ignore any track that contains black at the blue cursor. No more need to create add-edits in black and put rollers on them. And no need to get rid of those add-edits later.
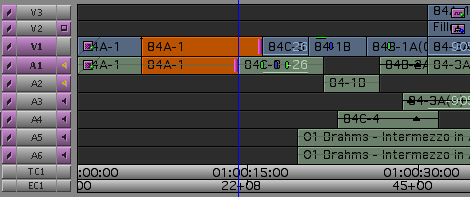
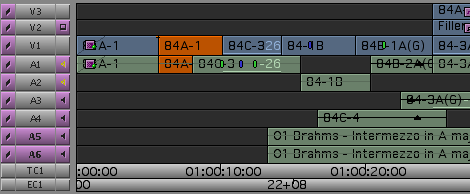
You can go from the first image below to the second in one step. Even though trim rollers are only on V1 and A1, everything stays in sync, and all downstream clips move forward.
In some cases, the blue cursor doesn’t necessarily need to be parked over black for sync locks to work. Nearby black will be trimmed, if necessary. But it’s not always clear what’s going to happen, so it’s probably better to use them only when the blue cursor is actually sitting on black.
Sync locks also allow you to extract a chunk of material in all tracks without having to turn them all on — all you need to do is enable a single track. When you hit the extract key you’ll pull material out of all tracks with sync locks.
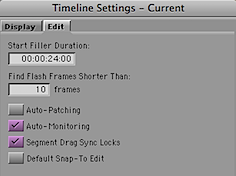
In general, sync locks don’t affect segment mode. So you should still be careful with sync when dragging clips around. A setting can help — but it’s quirky. It’s in timeline settings, under the edit tab: “Segment Drag Sync Locks.”
If you turn it on, sync locks will help keep you in sync in segment mode, but segment mode might not behave as you expect. For example, if you’re in yellow segment mode and you want to rearrange some picture clips, you’ll end up recutting any audio in that area — even though you’re not changing sync and you haven’t touched the sound. That’s just bad and ought to be fixed pronto. The tradeoff is that you will be able to move L-shaped picture and audio clips together, inserting black as needed to avoid unnecessarily chopping things up. That’s so tantalizing that I’ve left this setting on for months now trying to get used to it. But I’ve reluctantly decided to leave it off. Avid badly needs to take another look at this. It wouldn’t take much to make it work well.
None of this however, changes the fact that I live by sync locks. If you’re in segment mode most of the time you may prefer them off, but if you tend to be in trim mode a lot sync locks should be your friend. If you haven’t tried them lately, you might want to take another look.
Keep in mind that sync locks are remembered separately for each sequence. So you’ll need to turn them on every time you make a new one. To turn all sync locks on at once, click the rectangle under the sync locks column in either EC1 or TC1. To turn them all off, click there again.


February 16, 2009 at 3:24 pm
It’s interesting: Final Cut Pro’s timeline basically works on a “sync locks on all the time” system, yet whenever I go back to the Avid, I fall right back into my old habits and never turn them on. (I can’t use my Avid habits in Final Cut: Final Cut won’t let you add edits into empty space.)
February 16, 2009 at 7:19 pm
I have them on all the time. When I went back to Avid after a few years on FCP I had to turn them on…forgot that the default to off. Even when I was cutting on Avid and had no idea that FCP existed, I turned my Sync Locks on all the time.
Good tip.
February 18, 2009 at 8:46 pm
I’m going to work with this. I also spent some time on FCP and got used to its “always one” sync lock. But the “always on” aspect I found typical of FCP, in that it has that vestigial consumer “We’ll keep you from hurting yourself” approach. I was surprised it couldn’t be turned off.
But returning to Avid I am interested in exploring how it works. I’ve spent years doing elaborate asymmetrical edits to keep things in line, but I know there’s a better way.
Thanks for the tip – I’ll be checking this out.
May 10, 2009 at 2:04 pm
Sync isn’t always on in FCP. It’s toggled by SHIFT+L or the chain link button in the top right hand corner of the timeline window. All other modifiers used ‘L’ have a sync or linking function as well; depending on what media is selected.
For example: If you’ve captured media with separate Left and Right channels of audio is can be real annoying selecting them individually to drag them around the timeline (if you’re working in stereo). You can join them as a stereo pair with ALT+L.
July 22, 2009 at 10:53 am
Thanks…yeah, I’ve had to learn the hard, embarassingly painful way how important sync lock can be, especially with longer form projects. I’ll be zoomed in on the segment I’m working on, only to zoom out an hour later to see that ALL my audio is out of sync downstream.
I’m relatively new to Avid and NLE’s in general…I think I tend to rely on segment mode most of the time, in combination with my nudge shortcut keys. Is this a poor habit to get into—should I be leaning more toward trim mode?
July 22, 2009 at 11:16 am
Well, there are no rules, of course. Whatever works for you and gets your sequence to the state you want is the right method for you. Flexibility is a big part of what makes these systems so powerful.
But trim mode in the Avid, has so many advantages that I use it much more often than segment mode. (Final Cut’s trim tools are much weaker.) The advantages include: JKL trimming, cutting on the fly by hitting a mark while the cut loops, the ability to monitor and adjust any part of a cut (video or audio) while dragging the others along and keeping sync, the ability to trim in two directions at once, the ability to see both sides of a cut play together, and … sync locks, which don’t work well in segment mode.
July 22, 2009 at 11:57 am
Don’t fret Andy,
Like Steve said, there truly are no rules to this.
My first NLE was Premiere then FCP for a decade or so and I’ve only recently used AVID. I’ve cut with many different editors on a lot of different rigs. I’ve assisted for Oscar nominees and even they use some combination for trim / segment editing. I think, anyone who’s worked on a flatbed would lean toward; making an audio cut work, or making just a video cut work and then re syncing the rest.
I find in both film and tv editing that I’m constantly echo syncing the off-mic lines. So my favourite feature by far is seeing that out of sync frame count. Once I’ve echo’d it up to the actor’s timing. I’ll select the clip that’s out in segment mode, enter trim mode and type in the offset to bring things back to sync. That’s usually my first cut workflow.
December 9, 2010 at 9:47 pm
I’ve only ever used sync lock, and can’t imagine editing on Avid without it. Another handy trick: whenever I’m recutting a section of a show that’s already scored with music, I create two new audio tracks in the timeline, leave sync lock off for those tracks only, and drag the music cue down there. That way I can add or extract picture and sync audio to my heart’s content without mangling the music… then when I’m done with the picture, I can lengthen or trim my music cue as needed without affecting the other tracks. When I’m finished, I simply drag the music back to the upper (sync-locked) audio tracks where it came from. (Did this make sense?)
December 10, 2010 at 8:13 am
Sure. I often work the same way.
July 7, 2012 at 1:34 am
Reblogged this on Uttarakhand Cinema.