Archive for the ‘Avid Technical Tips’ category

Undo Record Events Only

September 15, 2009

It doesn’t happen often, but running out of undos can be pretty frustrating. MC 4.0 makes that a lot less likely by increasing the number of undos from 32 to 100. (And of course it allows you to jump through multiple steps using the  Edit menu.)

One problem that many people encounter is how easily the redo list can be cleared. Just about any action (any “do”) will wipe out the list. That includes making a mark, or even just loading a clip into the source monitor. You’re working away, you undo a series of steps, thinking you can always redo them. And you load a clip, or make a mark. Bye, bye redo list.

But it turns out that there’s a setting for this. You can force the system to remember only record-side events. This makes the redo list significantly more resilient — making a source mark or loading a source clip will not clear it. The trade off is that you won’t be able to undo anything you did in the source monitor, but I find that I rarely need that. I haven’t used it extensively yet, but I’m optimistic that it’s going to work out nicely in practice. It’s called “Undo Only Record Events.” It’s in the Edit Tab of Composer Settings.

composer_settings 2

An Introduction to Transition Preservation

September 11, 2009

Media Composer 4 introduced Transition Preservation, Avid’s term for a group of enhancements that improve the handling of dissolves during editing. It’s one of those features that’s so intuitive that it immediately feels like you’ve been using it for years — and then you wonder how you did without it for so long. It’s all about timeline dynamics, and that makes it difficult to explain in words. So I’ve posted a video that explains it.

As mentioned in a comment from Grant yesterday, Transition Preservation might be all the reason you need to move to 4.0. Watch the video below or check it out a larger version on Vimeo.

Tech Tips Organized for Your Enjoyment

July 1, 2009

Responding to popular demand (thanks, Harry), I’ve put up a page with a complete list of the tech tips I’ve posted, organized by subject. You can always click on the category menu in the right-hand column and select “Avid Technical Tips,” but the tips list should make things easier to find.

It’s here: Avid Tech Tips

The list will always be available under “Pages” in the right-hand column. And I’ll keep it up to date as additional tips are posted.

Editing DVD Material in an Avid

June 23, 2009

I recently had to re-edit some source material that lived only on a DVD. And I had to do it at home on a software-only Media Composer system. Many friends told me not to attempt this–too many settings, too many ways to screw yourself up. Better to use a good DVD player, using component or SDI outputs, and digitize via hardware: Adrenaline, Mojo or Nitris. But I didn’t have the hardware, so I persisted.

There are indeed, many, many ways to convert DVD material to Avid media, and by now, it seems like I’ve tried them all. I’ll describe the workflow I came up with below. It seems to work well and once you figure it out, it’s not all that hard to do. Quality is quite good.

The process begins with software to get the video off the DVD. On a Mac, you can use Handbrake, Cinematize, and MPEG Streamclip, among other applications. MPEG Streamclip has two advantages: it’s free, and it’ll digitize directly into Quicktime formats, including the Avid QT formats. Handbrake will only transcode into different MPEG flavors or AVI, so to get into a Media Composer you have to transcode twice. Video captured that way looked okay, and if you’ve got Handbrake I wouldn’t be afraid to use it, but I wanted to skip the extra step. I ended up with MPEG Streamclip.

Settings are critical. You want to digitize into a 480-line format. Video on DVD is 480 lines high. But standard def is usually 486 lines and those extra six lines can create problems, putting horizontal bars into your video when you output. The most common 480-line non-mpeg format is DV. But it turns out that there are several flavors of DV. If you use the standard Quicktime DV codec in an Avid, you can end up with elevated blacks. Better to use the Avid DV codec. The Avid version has another  advantage. You can work at DV50, which offers twice the bandwidth and more color resolution (422) — roughly equivalent to Digibeta.

Insert your DVD and open MPEG Streamclip. Select File > Open DVD and point the application to your DVD. Pick the track you’re looking for. If necessary, open each track and play it to figure out which is which. Streamclip asks if you want to fix timecode breaks. I skipped that step.

Choose the audio track you want. If you have a two-track (dolby stereo) version on the disk you’re probably better off with that. MC doesn’t understand 5.1 and you’ll have to load the individual tracks separately. Then select File > Export to Quicktime. Here’s where the fun begins.

I set the basic import options as follows (if you have trouble seeing the screenshots, click them and they’ll enlarge in a new window). The main idea is to use the Avid DV codec at 100% quality, lower field dominance. If you’ve got 24p material on your disk you’ll want to de-telecine it, and you may need another application. I didn’t experiment with that.

MPEG Streamclip Options

Click the Options button to reveal the Avid DV Codec options. Be sure to select DV50 and RGB levels.

Avid DV Codec Options

Then click Make Movie to begin digitizing. On a dual-core Macbook Pro this took roughly real time. When you’re done you’ll have a Quicktime-wrapped Avid DV file.

You now have to import this into the MC. The idea is to simply remove the Quicktime wrapper without altering the underlying video. To do that, you have to get the MC to do a “fast import.” Open your Import settings and set them up like this:

Import Settings

The critical settings are “Image sized for current format,” and “601 SD.” That’s right — you want RGB, but if you select “Computer RGB” the video will be re-encoded. The button is apparently misnamed — “601” really means “don’t muck with it.” Audio will come in first. When video starts loading make sure the progress bar says “fast import.”

When you’re done you should have a very clean-looking piece of Avid media. Mine was also very responsive, using a laptop with nothing but a Firewire 400 drive. To see the video in its full glory be sure to select the green/green quality setting at the bottom of your timeline.

Edit away, as needed.

When you’re ready to output, your best and fastest option is a Quicktime Reference file. This references your Avid video media and avoids re-encoding it. You’ll want to use the Avid DV codec and set RGB levels, which is where you’ve been all along. (Of course, the reference file won’t work on another machine unless you bring your Mediafiles folder with you.)
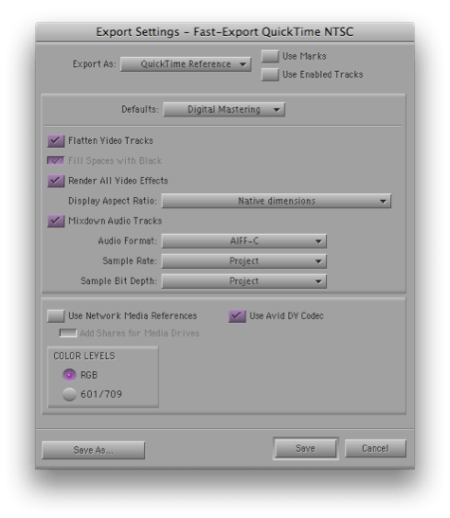
Export Settings

And that’s it. Seems easy now, doesn’t it? But I must have done 25 tests over a period of a week to get all this worked out, and there are issues I didn’t fully deal with (de-telecining and using the 5.1 audio, among others). There really ought to be a better, simpler way. But without extra hardware, this approach, or something like it, looks like the best you can do right now.

Many thanks to Rainer Standke, Michael Phillips, Jeff Ruscio, Michel Rynderman and everybody on Avid-l for their help with this.

Techniques and Tips Book Redux

June 17, 2009

As some of you know, I’ve commenced work on an update to my venerable “Avid Media Composer Techniques and Tips” book. The original version began life way back in the mid-90s, when I was working closely with the Avid engineers, helping them design an interface and feature set that would work for people like me. The software was changing very rapidly, and much of what we were doing wasn’t getting documented. So I put together a short, one-page cheat-sheet of hidden Avid commands for my friends. That list eventually grew to over 100 pages, with screen shots for everything. Assuming that I couldn’t interest a publisher back then, I published it myself, and ended up selling thousands of copies to people all over the world. Many editors have told me that it fundamentally changed the way they work.

The Media Composer has evolved a lot in the intervening years and so, prodded by friends, I’ve decided to update the book. The project has turned out to be much bigger than I’d imagined (among other things, all 350 illustrations had to be redone), but I’m well on my way to finishing. All kinds of new material has been included, and it’s now about twice as long as the original. A few friends have been reading it and I’ve been surprised and gratified by how much they’re getting out of it. It’s now tentatively called “Avid Agility.”

Stay tuned — I hope to make it available to you all soon.

Clean the Mouse

June 16, 2009

I know it sounds faintly ridiculous, but cleaning your mouse can make a real ergonomic difference for your wrist and forearm. I’m often amazed at what people will put up with in a mouse. It seems like this is the most basic connection you make to the computer. Many of us are dragging and clicking on it non-stop, and it ought to feel as good as it can.

I’ve got a Microsoft Intellimouse Optical, which I love for it’s low profile (easier on your wrist), very smooth travel, flexible software, and the presence of five, easily distinguished buttons. It only touches the surface on four small feet, but they can get gummed up. The deposit can be nearly invisible, but it can produce a noticeable increase in the effort needed to move the thing precisely.

I’ve been working pretty hard lately and thought I was feeling resistance in the mouse. The feet seemed okay on quick inspection, but a couple of minutes of scrubbing made me realize just how bad they were — it felt totally different. I use rubbing alcohol for this purpose, available for a buck or two at any drug store. It’s best to get the concentrated, 91% version, which contains less water and makes it safer on equipment. And be sure to unplug the mouse before you start!  It’s tempting to just turn the thing over and look at it, but you don’t want to be looking into the laser.

Your mousepad is also critical. They may look similar but small differences in the surface texture can dramatically change the way a mouse will track and feel. There’s some kind of alchemy that occurs between the composition of the mouse feet and the surface of the pad. A pad that works best for one mouse may not work so well for another.

You may not be as persnickety about this as I am, but if you’re having wrist or forearm pain, you might be surprised by how much a good mouse — or a clean one — will help. Go to your favorite computer or office store and check them out.

Finally, a suggestion: I program one mouse button as a double-click (a single click on this button has the effect of a double-click). It seems like a small thing, but I do an awful lot of double-clicking to load source clips and this has made a very noticeable difference in the way my arm and wrist feel at the end of the day. It’s also more positive — when you hit the double-click button your clip loads every time. Not all mouse software can be programmed this way, but the Microsoft Mouse driver makes it easy.