Archive for the ‘Avid Technical Tips’ category

Sync Locks and Why You Need Them

February 16, 2009

I’ve noticed that a lot of people don’t turn sync locks on in the timeline. That seems like a shame to me. In the old days this feature was buggy and many people ended up avoiding it. But now I leave them on all the time. The reason is simple — sync locks allow you to make complex trims on multi-track sequences all day long and still be in sync when you’re done.

Specifically, it means that when you’re trimming, you can ignore any track that contains black at the blue cursor. No more need to create add-edits in black and put rollers on them. And no need to get rid of those add-edits later.

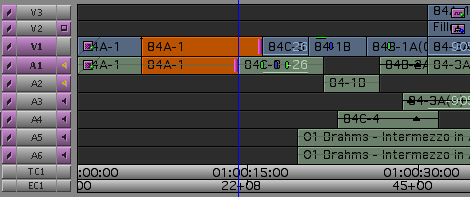
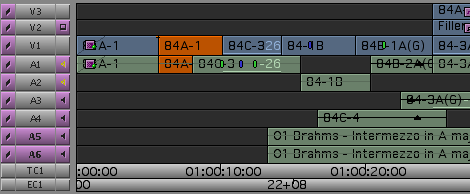
You can go from the first image below to the second in one step. Even though trim rollers are only on V1 and A1, everything stays in sync, and all downstream clips move forward.

sync locks - before trim.png

sync locks - after trim.png

In some cases, the blue cursor doesn’t necessarily need to be parked over black for sync locks to work. Nearby black will be trimmed, if necessary. But it’s not always clear what’s going to happen, so it’s probably better to use them only when the blue cursor is actually sitting on black.

Sync locks also allow you to extract a chunk of material in all tracks without having to turn them all on — all you need to do is enable a single track. When you hit the extract key you’ll pull material out of all tracks with sync locks.

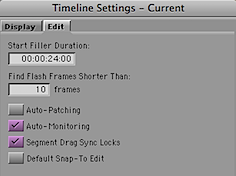
In general, sync locks don’t affect segment mode. So you should still be careful with sync when dragging clips around. A setting can help — but it’s quirky. It’s in timeline settings, under the edit tab: “Segment Drag Sync Locks.”

Timeline setting - segment drag sync locks.png

If you turn it on, sync locks will help keep you in sync in segment mode, but segment mode might not behave as you expect. For example, if you’re in yellow segment mode and you want to rearrange some picture clips, you’ll end up recutting any audio in that area — even though you’re not changing sync and you haven’t touched the sound. That’s just bad and ought to be fixed pronto. The tradeoff is that you will be able to move L-shaped picture and audio clips together, inserting black as needed to avoid unnecessarily chopping things up. That’s so tantalizing that I’ve left this setting on for months now trying to get used to it. But I’ve reluctantly decided to leave it off. Avid badly needs to take another look at this. It wouldn’t take much to make it work well.

None of this however, changes the fact that I live by sync locks. If you’re in segment mode most of the time you may prefer them off, but if you tend to be in trim mode a lot sync locks should be your friend. If you haven’t tried them lately, you might want to take another look.

Keep in mind that sync locks are remembered separately for each sequence. So you’ll need to turn them on every time you make a new one. To turn all sync locks on at once, click the rectangle under the sync locks column in either EC1 or TC1. To turn them all off, click there again.

Turn on all sync locks at once.png

Moving Individual Settings Between Machines

February 4, 2009

Sometimes it would be helpful to transfer an individual setting pane from one system to another — without bringing in an entire user profile. It turns out that this is trivially easy, but few people seem to know about it.

First, click the settings tab in the project window. Then select “New Setting File” from the File menu. An “untitled” window appears.

New Setting File Window

Now just drag a setting or settings from the project window to the untitled setting window. It will be duplicated into the new settings window.

Settings File

Now simply select “Close Setting File” from the File menu, indicate that you want to save it, and specify a location. This will create a .avs file on your disk. Note that you don’t want to select “Save Setting File,” because, perversely, you won’t see a Save dialog this way. The file will be saved to your Avid user folder with the name “Untitled,” and you’ll have to navigate there to find it.

Move the .avs file to another system, click on the settings tab and select “Open Setting File” from the File menu. The setting window you saved will open. Then just drag the setting to your project window. The MC will ask you if you want to overwrite the existing version of this setting or create a new one. You’ll probably want to create a new one so you can go back to your old setting as needed. Name the new setting as needed, and activate it by clicking to the left of  the name.

Note that you don’t want to double click on the .avs file. On my Leopard Mac, the OS sees the file as a Photoshop file and opens Photoshop rather than MC.

That’s it. You’ve moved a setting from one machine to another.

Technorati Tags: , , ,

Deleting a Clip in One Step

January 24, 2009

Back in the old ABVB days, if you wanted to delete a clip you simply selected it in segment mode and hit the delete key. But Meridien changed that. If a clip contained effects, (or, in the case of an audio clip, if it contained volume graphs), then selecting and deleting only deleted the effects. You had to re-select the clip (or clips) and hit delete again to make it disappear. The re-selection turned out to be a pain, especially if you were trying to delete several clips at once.

Well, it turns out that the Media Composer does indeed offer a shortcut for single-step clip deletion. It’s the ordinary cut command (command-x on the Mac, ctrl-x on the PC) — but with segment mode turned on. To delete a clip in one step, hit red segment mode, click the clip and then hit cmd-x. The clip goes away. (This is different from hitting cut when segment mode isn’t on. In that case you’ll cut everything between your marks.)

A couple of additional tips:

  • The cut command obeys the segment mode you’re in. If you’re in extract/splice-in (yellow) the clips are extracted. If you’re in lift/overwrite (red), they’re lifted.
  • You can use this command to delete a range of clips without selecting them all. Click the first and last clips in a group and hit cmd-x and the clips will disappear along with everything in between.
  • The material you cut goes to the clipboard. So if you want to put it somewhere else just load clipboard contents into the source monitor (with the clipboard button or the pull-down menu above the source monitor) and edit as needed.
  • Since the material goes to the clipboard, it’ll obey the paste command (command-v), inserting it at the current cursor position. If you prefer an overwrite, then select lift/overwrite segment mode first.

Technorati Tags: , , ,

What You’re Missing In Meridien

November 18, 2008

This is going to sound like a plug for the Media Composer, and I guess it is, but if you’re not using a new Avid (version 3.0.5 or beyond), you’re missing out on a lot of new functionality that has gotten into the system over the last couple of years. Avid has not done a good job telling editors about this stuff, but for me many of these features are now requirements — I don’t want to work without them.

If you’re still using Meridien, this is what you’re missing:

  • 16 tracks of playable audio.
  • Realtime audio dissolves.
  • Multiple tracks of realtime visual effects.
  • Select everything to the right. This function, new in 3.0.5, makes it easy to open up space in the middle of an overlapped sequence. I use it every day now. (Covered in more detail in this post.)
  • Realtime timecode burnin. Display timecode, keynumbers, footage, a title and any data you want from bin columns — without rendering.
  • Stabilize effect. It let’s you smooth out a rocky shot, or even add a steadicam look to a static shot. (Covered here.)
  • Spectramatte. One button gets you a clean, realtime, greenscreen.
  • Faster waveform display (still not perfect, but good enough to leave on most of the time).
  • Much faster saves, even with big bins. (And autosave now works correctly. In older releases of Adrenaline, autosave saved every bin, whether it had changed or not.)
  • Timeline responsiveness. Earlier versions of Adrenaline couldn’t keep up with timeline dragging.
  • Overall responsiveness. Eight-core Macs make for a fast Avid.
  • Stability. I’ve been working with a Mac Pro and version 3.0.5, with Adrenaline and Unity for five weeks now with only one crash (in standard def., mind you).
  • Scroll Wheel support. If you have a mouse with a scroll wheel, you can use it to navigate bins or the project window.
  • OS X Leopard. Complete with Quickview, Spotlight and Time Machine.
  • Improved locators. They now work the way they did in ABVB. Hit a locator button and get a locator. No need to see the dialog box anymore, unless you want to.
  • Additional improvements to segment mode. The ability to select and move any arrangement of clips; the ability, at long last, to move a stereo pair from one adjacent track to another; better preservation of dissolves when dragging clips around.
  • Improvements to trim mode. The ability to select two head or tail frames and trim them together and stay in sync.
  • Restore last trim. One button brings your rollers back where you left them.
  • High Def. The pièce de résistance. With the new Mojo or Nitris hardware, or with software-only systems, I’m told that HD now works well. (But I haven’t used it in a production setting, so I can’t vouch for that.) With today’s storage prices, and the DNX36 codec, HD just isn’t that expensive anymore.

Bottom line: It’s time to try a new Media Composer. Yes, there are still bugs, and you’ll find them. But if you’re like me, once you begin using a up-to-date system, you’ll wonder how you lived without these new features for so long.

Technorati Tags: , , ,

Taking Work on the Road

November 9, 2008

Many of us have been sorely frustrated by how difficult it is to pack up media for work on the road. In a typical situation you want to take a scene or a couple of scenes home and work on them on a laptop. You don’t want all the media for your show, just a small subset. You need to identify all the media for a specific bin and copy it to a portable drive.

The old and slow way to do this is to reveal file on each of your master clips and then copy those files in the Finder. It’s a laborious process and easy to screw up.

But it turns out that there’s a much easier way. It’s hidden, but when you know how to set it up it does what you want with a lot less work. It’s under the Export menu.

Open the bin you’re interested in. Select all your source clips — master clips, subclips or groups. No need to find the source master clips.

Then select Export from the File menu.

export-dialog

Start by selecting an export setting. The easiest place to begin is with “Export to Pro Tools.” Then click the options box.

Here’s where things get counter-intuitive. For “Export As:” select AAF (or OMF). You have to make an AAF for every clip. You won’t need these files, but the MC insists on creating them. To keep them organized, ceate a folder on your export drive for them.

Then select “Include All Video Tracks in Sequence” and “Include All Audio Tracks in Sequence.” This is true even though you aren’t exporting a sequence at all.

In the audio and video tabs, select “Export Method: Copy All Media.” This is the crucial step. You’re not consolidating — just copying. If you don’t, you’ll create a bunch of “.new” clips. Leave all other options unchecked. Select a destination drive (a “media drive” not a “folder”) for both video and audio.

Here’s the video tab:

export-video-tab2

And the relevant part of the audio tab:

audio-settings

When you’ve got your options set up correctly, hit Save and then select Save again in the Export dialog.

A new MediaFiles folder will be created on your target drive and the MC will copy all relevant media to it. The folder you made to hold the AAFs will get an AAF file for every source clip. You won’t need those files and, for reasons that will be clear in a moment, you probably want to delete them.

You’ll have to copy the bin (or bins) you need to your laptop manually, but that should be easy. It will automatically link to the new media — no relinking needed. (I’m told that on PC-based systems you may have to delete your media databases on the portable drive.)

One nice additional feature is that in the future, if you add a material to a bin and need to export the media again, the MC will intelligently decide which files already exist on your external drive and will copy only those that aren’t already there. And that’s why it’s handy to delete your AAFs/OMFs. If you leave them alone, the MC will ask to overwrite them, one laborious file at a time, and you’ll have to confirm a separate dialog box for each clip. It’s much easier to have the MC recreate them all.

This process isn’t exactly intuitive, but it’s easy to do once you know a few tricks. It should make it a whole lot easier for editors to take work on the road.

Technorati Tags: , , ,

Media Composer 3.0.5 / Select Right

September 30, 2008

Media Composer version 3.0.5 was released this week and, along with some key bug fixes, it offers a couple of important new features.

First and foremost, it allows you to select all clips to the right or left of the blue cursor, or all clips between marks. This makes it trivially easy to open up space in the middle of a complex, overlapped timeline. Just select all tracks, hit the new “select right” button and drag everything to the right. Voila, you’ve got a nice empty space in your timeline, without cutting up any clips or doing any cleanup work. Final Cut has had a similar feature for a long time, but it’s a valuable and nicely implemented addition to the MC.

Select Right makes it easy to go from this:

to this:

You’ll find buttons for these new features in the Edit tab of the command palette.

Second, you can now generate a report with lots of useful information about a particular sequence or source clip. You’ll find this in the “Get Clip Info” or “Get Sequence Info” windows, which have been expanded. For sequences, you can list all your effects or sources, among other things.

You access these reports by clicking in the source or record window and selecting “Get Sequence Info” or “Get Clip Info” from the File menu. You can also use the contextual menu — on the Mac, hold down shift and control and click on the source or record window.

Other changes in this release include a very important fix to the Save All command so that Autosave doesn’t waste time saving unchanged bins (hallelujah!), and a fix to the burn-in tool so it doesn’t crash over black segments when showing source info. There’s also a fix to trim mode so that when trimming two head or tail frames (a new feature in version 3) you’ll hear correct scrub audio. There’s a helpful fix to segment drag sync locks (in timeline settings), and a fix to the locator window so you don’t have to see it every time you create a locator.

All in all, this is a very useful release. Avid says it has only been qualified for OS X 10.5.4. I installed it on 10.5.5 and it seems okay so far.

If you’re using Media Composer software-only and you’ve already got version 3, you can download the update here. As usual, you must uninstall first. Avid really ought to fix that. The system should check for updates and do whatever uninstalling is needed automatically.

Technorati Tags: , , ,