Zoom Your Keyframe Graph
To properly control advanced keyframes, you need to see your keyframe graph clearly. Here’s an example. Let’s say you’re adding a push-in to a shot. You apply a resize effect, add a keyframe at the beginning and end, and increase the scaling at the tail keyframe. Then you play the effect. Instead of a smooth push from head to tail, your move starts slowly and comes to a stop at the end. What’s going on?
To figure it out, display the keyframe graph. It looks like this:
It sure looks like the zoom is continuous. But it’s not so. The problem is that your keyframe graph is so shrunken vertically that you can’t see what’s going on. The fix is to hit the Zoom to Curve Height button. This expands the display vertically to fill the graph. Now you can see what’s going on.
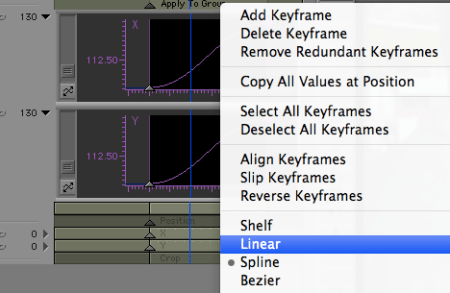
Advanced Keyframes default to spline interpolation — you get a smooth curve between keyframes, but motion stops at the beginning and end of the effect. In this case, you want Linear interpolation — the way traditional keyframes worked. Make your change by right-clicking in the Scaling track and selecting Linear.
The result is is a straight line between keyframes, and continuous motion head to tail. Now your push-in won’t stop at the end of the effect.
Explore posts in the same categories: Avid, Avid Technical Tips


May 2, 2012 at 3:29 am
How about expanding the display horizontally? What if two keyframes are only a couple of frames apart and I want a better view in order to manipulate?
May 2, 2012 at 7:01 am
The slider below the keyframe display controls horizontal scaling. Push it to the right to zoom in left-right.