Archive for the ‘Avid Technical Tips’ category

Tip Grab Bag Part 2

May 15, 2007

Here are a few more tips I picked up at the Keycode demo.


Scroll Wheel Joy

If you’re like me, you’ve become dependent on a mouse with a scroll wheel (my favorite is the Microsoft Intellimouse Optical). But until Adrenaline, this didn’t work in the Media Composer, and even in Adrenaline, scrolling speed was so slow as to be all but useless. Version 2.7 changes that. Scrolling is now quite effective, and once you start using it I suspect you’ll soon wonder how you did without it all these years. If you don’t like the default scrolling speed you can change it via Mouse Settings. I would have preferred somewhat finer control — normal was a bit slow and moderate was too fast — but regardless, your scroll wheel is now functional. You can assign other mouse buttons to Media Composer functions, as well.

Mouse-Settings


Horizontal Scrolling

If you’re working on a late model Mac laptop, you can now scroll horizontally with the track pad. Drag two fingers left or right and you can scroll bins and even the timeline itself. The catch, unfortunately is that you’ll scroll backwards. This makes a certain kind of sense in the timeline (try it to see what I mean) but in windows it’s pretty unnerving. (If your Mac doesn’t permit two-finger scrolling from the trackpad you can add it with iScroll.)


Matchframe Without Selecting a Track

You can quickly matchframe on a specific track without first selecting it, using a contextual menu pick. Just park your cursor over the track light for the track you want to match to and right click (on a Mac without a two button mouse, use control-shift-click). A menu pops up. Select “Match Frame Track” and you’ll match that track only.

matchframe-track.jpg


Enter Text for Several Clips at Once

Set-Comments

Suppose you want to enter the same text in a certain column for a group of clips. You can now do that in a single step. Select the clips, then put your mouse over the column in question. The cursor turns into a double-headed arrow. Now right click and a contextual menu appears. Choose “Set Comments column for selected clips…” Another window opens and you enter your text. Voila, that text is entered in that column for all the selected clips.

Technorati Tags: , , ,

Tip Grab Bag Part 1

May 12, 2007

At Keycode’s ScriptSync demo last week Michael Krulik described several smaller improvements that have been recently introduced, and I noticed a couple of others. It seems that Avid has been steadily incorporating such changes, but hasn’t done a good job of telling anybody about it. Hopefully, we’ll see more seminars like this one in the future.

Along with the major improvements introduced in version 2.7, these represent some additional reasons to upgrade.


Segment Drag Sync Locks

I always leave sync locks turned on when I’m cutting. This feature inserts or deletes black in trim mode to keep you in sync. But for as long as I can remember, it hasn’t worked correctly in segment mode. Rather than simply fix the problem, Avid has made the fix a preference — in the Timeline Settings. I tried it briefly and it seemed to work.

Timeline-Settings


Auto-Patching

The same settings panel offers another choice, which many editors seem to be unfamiliar with: Auto-Patching. If you turn this on, your patching will automatically follow your track selection. As you select your tracks patching follows automatically. It’s quick and intuitive and might work for you.

Auto-Patching


The Return of the Scrolling Timeline

Meridien’s scrolling timeline disappeared in Adrenaline, but it’s back. Just select “Scroll While Playing” in Timeline settings and the timeline will move under a stationary cursor.

scroll-while-playing.jpg

In general, timeline performance is much improved in 2.7, and dragging through the timeline feels extremely responsive. This had been a big problem in some early versions of Adrenaline.

I’ll continue with more tips tomorrow.

Technorati Tags: , , ,

Clarifying Avid Project Types

April 24, 2007

It seems like a lot of people are confused about the new “23.976p” Avid project type. This is an alternative to the traditional Avid film project (“24p”) and you can only work with such a project on a modern machine (Meridien 10.8 or later). People have been using it for roughly a year now and over time, it’s probably going to be widely adopted.

The difference between the two types is pretty subtle. In both, the machine digitizes from video running at 29.97 fps and removes pulldown (aka “reverse telecine”). You end up with the original 24 film frames. What makes the project types different is the audio sample rate that’s synchronized with picture.

In a traditional 24 fps project, pulled down audio is synched with pulled down video. That is, video running at 23.976 fps (or 29.97 fps) is synched with audio running at 47952. All the speeds are a tenth of a percent slower than their “normal” rates.

That has worked very well for the film industry for a decade and a half. But when this scheme was originally developed there was no such thing as digital videotape — and therein lies the rub. Digital videotape works differently, synchronizing pulled down video to full rate audio. Video running at 29.97 (or 23.976) syncs with audio running at 48K, not 47952.

A 23.976 project works like digital videotape, synchronizing pulled down video with full rate audio. That makes it appropriate for video-originated material shot at 23.976. It can be useful for film originated material, as well, because it can give you better sound in the Avid.

If your film was telecined to digital video, with dailies synchronized in telecine, and you’re loading from tape, then you want to load digitally, if possible. You won’t have to set audio or video levels and everything will be pristine. The problem is that in a traditional 24p film project your Avid expects to see video at 29.97 and audio at 47952. Unfortunately, your tape has audio running at 48K. In Meridien, this was handled with “poor man’s sample rate conversion” — the system simply dropped audio samples to convert 48K to 47952. That worked okay for dialog but it’s not ideal.

In Adrenaline that trick won’t work — sync will drift. So you’ll have to load your audio analog. (Your audio will also have to be analog when you play out to digital videotape.) The alternative is to use the 23.976p project type. That will allow you to load everything digitally.

There are a couple of issues that you should be aware of. First, your sound editors will have to work differently, and set their Pro Tools systems to work 48K “not pulled down” — the way they would for a 29.97 project or a show that shoots on video. That shouldn’t be a problem, but it will be a surprise, and they should be warned — before you make a final decision about your project type.

The second issue has to do with production audio and how it’s recorded. On a film shoot, audio is normally recorded at 48K with 30 fps timecode. When that audio lands in telecine it gets pulled down for transfer — to 47952. But the tape wants to see 48K, so, even though the 23.976 project has allowed you to create a digital audio path in your cutting room, you’re facing at a sample rate conversion in telecine. The answer is for production to shoot audio at 48048. When that audio is pulled down in telecine it’ll end up at 48K and will go to your digital videotape without conversion. If your final delivery format is HD video, then shooting at 48048 means that dialog can run through your whole workflow without sample rate conversion.

Here are a few rules of thumb:

1. If you are shooting on film and transferring to tape and your workflow is well established, there’s no need to change it. You still want to use a traditional 24p project type.

2. If you are shooting on HD video at 23.976, then you want the 23.976 project type.

3. If you are shooting on film and telecineing to digital video and you want the purest audio you can get in the Avid, you may want to consider a 23.976 project. For even better audio in the Avid, production should shoot at 48048. (This is especially true if you’re making a TV show where your final delivery will be on HD tape.) But before you try this, check with your post supervisor, production mixer and sound effects supervisor. Make sure everybody is on board.

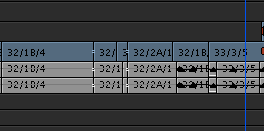
For those of you who are interested, here’s a table that lays out the rates:

Shoot Project Production Telecined to In Avid & PT
Film-24 fps 24p 48K/30 fps TC 29.97 or 23.976/48K 23.976/47952
Film-24 fps 23.976p 48K or 48048/30 TC 29.97 or 23.976/48K 23.976/48K
Video-23.976 23.976p 48K/29.97 TC 23.976/48K 23.976/48K

Final Cut, for what it’s worth, only works one way — like digital videotape. That’s simpler, but less flexible. It works in a video-dominated world, but can present problems in certain circumstances with film production.

Technorati Tags: , , , ,

Keyframe Madness

March 22, 2007

Can it really still be true that when you trim a shot that carries a segment effect, all of its keyframes move? Presumably, the original idea was that if you have an effect on a shot and you change the shot length, then you must want the effect to change proportionately. This was probably harder to implement than the alternative — chopping off keyframes. But for me and for everybody I know, it creates hidden effects that are almost never desireable.

Keyframes are generally aligned with action and need to stay attached to the frames I put them on. Or the distance between keyframes — ie. the speed of an effect — was deliberately chosen and I don’t want it to change. So every time I trim or extend a shot with a segment effect I have to laboriously write down the positions of all its keyframes, make the trim, and then move them back where they were. A minor adjustment can cause dozens of keyframes to move.

The workaround is to use lift or extract rather than trim. This leaves keyframes where they were. But you can’t lengthen something that way.

(Transition effects are immune to this kind of thing, by the way. If you trim a shot that carries a fade, the fade length is preserved. Ditto with a dissolve.)

This “feature” can’t be that hard to fix. If lifting/extracting does the right thing, then some of the needed code is already written. If people at Avid are worried that customers won’t be happy with such a change then make it a preference. But I don’t know anybody who wouldn’t welcome it.

Technorati Tags: , , , ,

Quicktime Pro

January 31, 2007

Avid has done a pretty good job of making OMF the professional standard for sound turnover, but for picture, Quicktime is king. I’m finishing up a show now that used no tape in our turnover process — none for the DI, none for sound effects and music, none for mixing. The only videotapes we generated were for overseas looping where the facility insisted on it. This kind of workflow has held sway on shorter projects for some time now, but for major features, a fully-digital, quicktime-based workflow is relatively new. The advantages are many: better accuracy, better quality, lower cost and the ability to send material around via the net. On a good projector, Quicktime can look better than tape.

I suspect that this represents a competitive advantage for Final Cut over Avid, since FCP is Quicktime-native. But with the use of the Avid Quicktime plug-in, the Media Composer can function pretty well in a Quicktime world.

One essential tool for Avid folk is Quicktime Pro. It’s an upgrade to the Quicktime Player that opens up important additional functionality, namely the ability to do limited editing and make conversions from one format to another.

As an example, I recently needed to create a DVD with a new temp-mix audio track. Since we already had a locked QT picture for each reel the easiest way to do this was to use QT Pro and combine the existing picture with the new sound. The procedure is this: open the picture in Quicktime Pro and use the Properties window (command-j) to delete any sound tracks it contains; then open the audio files and use the “Add to Movie” command (command-option-v) to lay them under the existing picture. In our case, we had two mono tracks, so, again using the properties window, we identified them as left and right. We then saved the whole thing as a new Quicktime. That was much easier and faster than importing, editing and exporting with the Media Composer, and it was safer, too.

In short, Quicktime Pro belongs in every digital editor’s toolkit. At $30, it’s a bargain.

Tip #10 – Combining Versions

December 2, 2006

One of the trickiest things editors have to do every day is manage versions. I always try to keep one ‘hero’ sequence clearly identified. If I’m not sure about a change, I’ll experiment with it in a shorter sequence and call that an ‘alt.’ Then I can compare the master with the alt, either for myself or for a director or producer.

If I decide that the alternate is an improvement, I have to integrate it into my master sequence. Here’s a trick that uses Avid’s “match frame edit” marks to make that easier. (These marks are modeled after the old “through” marks that we once put on film with a grease pencil — two parallel lines marked across the splice would indicate that it was unintentional.)

First, put your master version in the record monitor and your alt in the source. Here’s the master:

master version

And here’s the alt. Note that two shots have been deleted.

alt version

Our first step is to mark two frames, one before and one after the change, where the alt and the master match each other. We mark in on a frame before the changed area and mark out on a frame after it. We mark the exact same frames in the source and the record, two marks in each, for a total of four marks. I prefer marking on “zero frames” where the frame count equals zero. That’s not strictly necessary but it makes it easier to keep all this marking straight.

Here’s the source monitor with both marks indicated:

source mon

Here’s the record monitor with the same frames marked.

record with marks

Now we’re ready to make the replacement. First check your patching. Everything should go straight across. You don’t want to be moving material from one track to another. Then simply hit extract (the scissors) and insert (the yellow edit button). The old material is deleted and the new material is inserted. This is what the timeline looks like after the insertion:

after extract and insert

Note the unintentional splice marks. That’s the key. They prove that you did the replacement correctly, that the new material dropped in at the right place and the cut points matched up. If you don’t see those marks in every track, you’ve made a mistake. Undo twice, check your marks and try again.

All that remains is to remove the unintentional splices. The easiest way is to lasso them and hit the delete key. Voila, your master version is up to date.

after throughs are removed