Archive for the ‘Avid Technical Tips’ category

Tip #3 – Measuring Effects

September 13, 2006

Xpress Pro doesn’t offer a center duration display, so to measure things you have to display “I/O” over the monitors. It turns out that this offers a subtle advantage when working in effects mode, which also doesn’t offer center duration.

I try to keep things as simple as possible when I make visual effects and when possible attempt to make the distance between keyframes an even number. It’s easier for the effects house to replicate my work if I make a fade 3 feet long, rather than, say 46 frames. But doing so isn’t as easy as it should be.

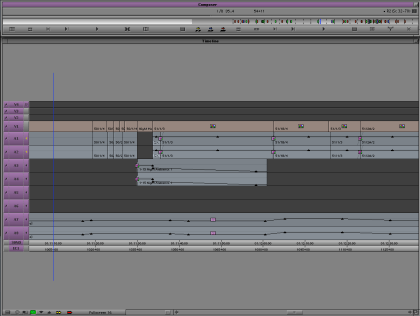
The trick is to display I/O above your record monitor. Then, when you are measuring an effect, make only one mark in the timeline. I/O will then show you the distance from the mark to the blue cursor position — and it will update as you drag your cursor around.

For example, if you want to make a three foot fade out in a super, put a mark out at the end of your fade, then put a keyframe roughly where you want to fade to begin. Click on the keyframe — as long as you have only one mark in the timeline, I/O shows you the distance to your mark. Now drag your keyframe around. As you drag, the distance to the mark updates, so you can put it exactly where you want.

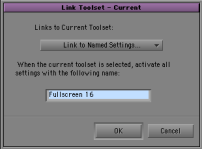
Here are the cascading menu picks you’ll need in order to show I/O in feet and frames.

Selecting I/O Display

Note that you can do the same thing over the source monitor, but in Xpress you have to load a sequence into the source for the menus to offer these choices.

Tip #2 – Toolsets and the Full Screen Timeline

September 9, 2006

We’re all cutting more tracks these days and there just doesn’t seem to be enough screen real estate to manage them. Ever since the early 90s, the Media Composer has offered a way to maximize the size of the timeline window, but few people seem to know about it.

To shrink your source and record monitors and create a view something like you see below, simply click the button at the top right corner of the Composer Window. (On newer systems the green “maximize” button at the top left does the same thing.)

Full Screen Timeline

The images are gone from your source and record monitors, but nothing else has changed. All your editing controls continue to work as you’d expect. If your system includes a client monitor, I think you’ll find it easy to get used to this setup, especially if you’re working only on sound.

Once your source and record monitors have been been resized, you’ll want to adjust the size of other windows and then save this configuration as a Toolset.
First, have the system memorize your normal configuration, so you can get back to it. From the Toolset menu, be sure “Source/Record Editing” is selected and then choose “Save Current.”

Then select “Audio Editing” from the Toolset menu. The system will shift to a default audio editing view, and open the audio mixer. Your job is to customize this view until it suits you. The first step is to invoke the Mini-Composer. Click the green maximize button or the button at the window’s top right corner.

Then manually resize the timeline to fill the rest of the screen. And move your windows around until the interface is set up to your liking. If you prefer to see the audio tool then leave it where it is (you can even switch it to show 8 channels and have that memorized, as well). When you’re satisfied, select “Save Current” from the Toolset menu.

Toolset Menu

Now try out your toolsets. Select “Source/Record Editing” and you should see a normal display. Select “Audio Editing” and you’ll go to the magnified timeline.

The final step is to associate a timeline view with a Toolset. That way, when you select “Audio Editing” you’ll not only see the enlarged timeline, but you’ll also switch to a track view that’s appropriate, with taller track sizes.

Just set up the timeline view as you normally would and memorize it by selecting Save As from the popup under the timeline.

Timeline View Menu

Then link that view to your Tooset. Get yourself into the Toolset using the Toolset menu. Then, from the same menu, choose “Link Current to…” In the dialog box that follows, type the name of the Timeline View you’d like to associate with that Toolset.

Link Tooset Dialog Box

(You can always change your timeline view while working. All this does it bring up a specific timeline when you choose your toolset.)

That’s all there is to it. Now, with one menu pick you can shrink the composer, enlarge the timeline and enlarge your timeline tracks. And you can get back to where you were just as easily.

Tip #1 – DVDs from Xpress Pro

September 7, 2006

I’ve always planned to include technical tips as part of this blog. Here’s what I hope will be the first of many: ways to make DVDs from Avid Xpress & Media Composer.

Most of us working on bigger pictures are making DVDs using standalone burners. These are cheap now and relatively fast, but they only work in an environment where you have an output that you can route to the thing. If you’re running Final Cut without a video card or an Avid without Mojo or Adrenaline, then you have to burn DVDs using the burner in your Mac or PC. And therein lie too many choices and a fair dose of vodoo.

I’m working on Xpress Pro with Mojo, but my project is PAL and I need to make NTSC DVDs. So I’ve been making DVDs internally.

This requires three steps.

  1. First you have to render every effect. If you’re adding a 1.85 matte or an ownership title, you must put that in your top video layer and render the whole bloody thing. This typically takes longer than realtime, but your mileage may vary
  2. Then you must make a Quicktime. You can do this two ways, either as a “Quicktime Movie” or a “Quicktime Reference.” If you make the QT reference the Avid will generate a stereo audio mixdown of your sequence and point the QT to that. Video will come from your media folder. (You’ll need the Avid codec installed in QT. It should have been installed when you installed Xpress. If not, Avid has a free installer on their website.) Making a QT reference has another important advantage: it renders everything first and thus allows you to skip step 1. (You don’t save time — the rendering still has to take place — but you save a step.)
  3. Once you have your Quicktime, drag it to your favorite burner software. I’ve been using Toast, which is effective and relatively simple. You can also use iDVD or DVD Studio Pro. Toast doesn’t offer much choice in terms of encoders. It will put about 101 minutes of material on a single sided DVD. Since my show is 104 minutes, I’m using double-sided disks, but in that situation Toast doesn’t allow you to choose the spot where the layer switches and, needless to say, that seems to happen at an unfriendly place every time. Toast will handle the conversion from PAL to NTSC, and you can tell it to save an image file of your disk so you can make another copy when necessary.

Assuming that you have to render a matte over the whole show, step 1 happens roughly in real time. Step 2 is real time again if you make a standalone QT (much faster in MC than Xpress, for some reason). Making a QT reference takes about 10 minutes for a two hour show, but if a lot of rendering has to happen then this step will take roughly real time. Step 3 takes about double real time, because the encoding takes forever and dual layer disks are slower to burn (it goes a whole lot faster on a dual-core machine). Total time for the whole shebang for a two hour film — as much as all day, and since there are so many steps, you have to babysit the whole process. Not fun.

My guess is that this works more smoothly in FCP because you’ve got DVD Studio Pro to work with and the system is QT native so you don’t have to convert. But I haven’t tried it so I don’t know.

In general, we need better ways to do this. It should be one-button simple and it should happen in the background. Nuf said.

Additional Details:

Here are the settings I’ve been using to export a QT reference movie. (After rendering everything, select your sequence in your bin, and choose “Export” from the File menu. Then choose “Fast Export Quicktime PAL” if you’re in a PAL project or “NTSC” if you’re working in NTSC.

Export QT ref settings

Here are the settings for a self-contained QT file:

Export Quicktime Movie Settings