Archive for the ‘Avid Technical Tips’ category

Collapse the Composer Window

November 13, 2009

I explained in the last post how you can hide the Source Monitor, but you can also collapse the  Composer window, hiding video entirely and showing only buttons, menus and tracking information. This can expand your screen real estate mightily, making room for a much-enlarged timeline with plenty of room to manipulate audio keyframes and see waveforms. If you’ve got a client monitor, you’ll view video there.

mini-composer-2

This view was once called the “mini-composer.” To invoke it on a Mac, simply hit the the green “+” button at the top left of the Composer window. Or right-click on a video image and select “Hide Video.” To go back to your regular Composer view, hit the plus button again or deslect Hide Video.

You can do anything in the mini-composer that you could do in the regular composer. Trim mode is available, for example, and works as you’d expect. You can even drag from a bin to the source or record monitor. Just drop your clip onto the mini-composer window.

Of course, you wouldn’t work this way all the time, but for audio work, it can be very useful. I make it part of my Audio Toolset. (For more about Toolsets see this video post.)

Hide the Source Monitor

November 8, 2009

You probably know that the Composer Window can be resized, but did you know you can completely hide the source monitor? This can be very helpful if you’re short on screen real estate and want to work on a visual effect where you need to make things big — an Animatte, for example.

hide_source_mon

To hide the source monitor, Option-click (or Alt-click) the Source/Record Mode button at the bottom of the timeline. Then enlarge the Record monitor by right-clicking it and selecting Full Size Video. Or you can simply resize the Composer window by dragging its bottom right corner — if you drag it into a roughly square shape the source monitor will disappear.

To restore the source monitor, option-click the Source/Record button again, or drag the monitor into a wide rectangle.

You’ll probably want to memorize your custom window setup in a Workspace or Toolset. See this video tip for details.

No More Jumping Rollers

November 1, 2009

Media Composer makes it easy to trim asymmetrically (simultaneously trimming some elements to the right and some to the left), but the technique contains a subtle bug. If you make an asymmetrical trim that eliminates a clip by trimming it away, the roller attached to that clip doesn’t know where to go — and it jumps to a nearby clip. In a complicated trim, this is inevitably jarring, and if you don’t catch it, it can lead to mistakes that you only discover later.

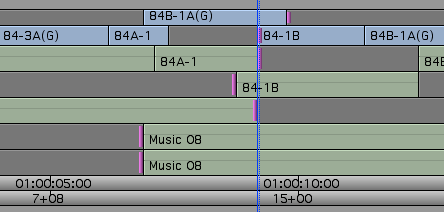
In the illustration below, if you were to trim to the right, and go far enough to eliminate the clip in v1, the v1 roller would jump to another transition.

asymmetrical_trim

The problem has been in the system for a long time — since asymmetrical trimming was introduced in the early 90s. Well, believe it or not, it’s finally fixed. In Media Composer 4.0 rollers never move. This may sound like a small thing, but if you spend a lot of time in trim mode, it might just be reason enough to upgrade. As the I Ching says “Perseverance Furthers.”

The Pros and Cons of Fast Scrub

October 26, 2009

If you’re using Avid’s new DX hardware (Nitris or Mojo), then you’ve probably been using “Fast Scrub,” perhaps without knowing it. This is a slick new feature that makes the timeline more responsive, by dramatically improving the number of frames displayed as you drag. Fast Scrub offers some of the smoothest timeline performance in the business — so smooth that you can often check your work just by dragging through it. It also improves audio responsiveness, especially if you keep the caps lock key down. (I don’t, but I know many of you do.) If you’re using DX hardware you’ll find it in Timeline settings. It’s turned on by default.

But if you like to leave waveforms on — and I can’t work any other way now — then Fast Scrub will make you crazy. Why? Because it causes waveforms to redraw much too frequently, even when you are just manipulating video. If you simply move a video clip in segment mode — with no change to any audio — all your waveforms, for your entire timeline, will slowly redraw, during which time you can’t do anything but wait. Many other seemingly innocuous things will also trigger a redraw. Undo will usually do it, for example. I’ve even seen redraws after simply changing a clip name in a bin.

With a fast CPU, waveform display in the Media Composer has become very usable (and waveforms in MC have always been much more detailed than in FCP). But with Fast Scrub you have to turn waveforms off, or keep a straight jacket handy.

Okay, so why not just disable Fast Scrub, itself? Timeline dragging is plenty responsive with software-only systems or even with Adrenaline, so turning it off  shouldn’t be a big deal. Unfortunately, with the DX hardware and Fast Scrub off, timeline dragging goes back to the way it was before version 3 — very slow. So you’re damned either way.

Caught between a rock and a hard place, I’ve had Fast Scrub off for a week or so now, and I’m getting used to it. But I sure wish the timeline could be as responsive as it is on my laptop at home.

New Avid Tip Podcast

October 24, 2009

AvidscreencastChristian Foerster has started a new Avid screencast of video tips that you can subscribe to via iTunes. There’s only one episode so far, but it’s very nicely done.

Check it out.  His website is avidscreencast.com. The itunes page is here.

Restore Default Patch

October 20, 2009

It’s the end of a long day and you’re working on a complex timeline: eight or ten audio tracks, many video tracks. You’ve been patching your source material all day long and the patch panel is scrambled. Now you want to cut something straight across. Maybe you’re assembling two sequences together, maybe you’re integrating part of an old version. You want all your patching to go away, so you carefully re-patch, one track at a time. But all those track numbers start looking the same and sure enough, you make a mistake.

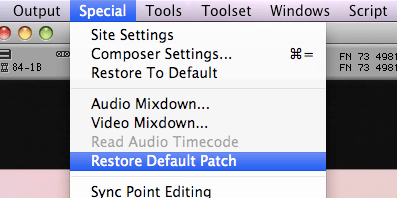
There’s an easier way. Hidden in the Special Menu is a option that instantly and reliably patches everything straight across: Restore Default Patch.

restore default patch 2

If you’re like me, you’ll probably want this command assigned somewhere on your keyboard. Then, with one button press, you’ll know you’re inserting material where it belongs.

Open the Command Palette (Command-3) and your Keyboard settings. Select “Menu to Button Reassignment.” Click the button you want to change, pull down the Special Menu and select Restore Default Patch. The letters RD appear on your chosen key. Hit it and standard patching is restored. I use it many times a day.