Real-Time Freeze Frames

Posted August 14, 2011 by Steve
Categories: Avid, Avid Technical Tips

The traditional way to make a freeze frame in Media Composer is with the Freeze Frame menu pick. You park on a frame in the source monitor, match back till you’re looking at a master clip, then select Clip > Freeze Frame and choose a length. This generates a clip of the frozen frame and media for it. You can then cut it anywhere you want.

But there’s an easier way — using the Timewarp effect. Instead of creating a clip in the source monitor, you apply the effect in the timeline and make a speed adjustment from 100% to 0%. The trick is to specify your keyframe type — to create an instantaneous change rather than a ramp.

First, identify the frame to freeze and add a locator so you can find it easily. Then drag the Timewarp effect to the clip, park on it, open the Motion Effect Editor, and display the Speed Graph.

Move the position indicator to your frame and add a keyframe. Then —  and this is the crucial step — right-click on the speed graph and select “Shelf.”

Enter a speed for your new keyframe — 0%. The result is a speed graph with a hard right angle at your keyframe — an instantaneous change from normal speed (100%) to a frozen frame (0%).

That’s all there is to it. Keep in mind that this is a real-time effect. It typically won’t require rendering, and you can overlay other effects on top of it. Because it’s real-time, it’s easy to change. If you prefer a different frame, just open the Motion Effect Editor and move your keyframe. (To ensure that you don’t change the speed, hold down Option and Shift while you drag.)

For more tips like this, check out my book Avid Agility, available at Amazon.

New Tools for Music Editing

Posted August 5, 2011 by Steve
Categories: Audio, Avid, Avid Technical Tips

Avid’s new stereo tracks and Real Time Audio Suite effects are both liberating and frustrating. Introduced in Version 5, stereo tracks allow editors to handle stereo pairs as single objects in the timeline, and control them with a single set of audio keyframes. RTAS effects let you apply up to five real-time audio filters to each track, quickly and easily. That’s the good news. The bad news is that you can’t automate these effects in any way — you can’t turn them on and off, and can’t change their values, anywhere within a sequence. Nor can you edit them from one sequence to another — you have to copy to a bin first.

Stereo clips are problematic, too, because they can only reside in stereo tracks. You can’t put a clip wherever you want, you have to dedicate a track to these clips, again, throughout your show. Meaning that if you have only a few such clips, you’re wasting a whole track for them. And since Media Composer only plays 16 tracks, a couple of stereo tracks — each equivalent to two mono tracks — can waste resources big time.

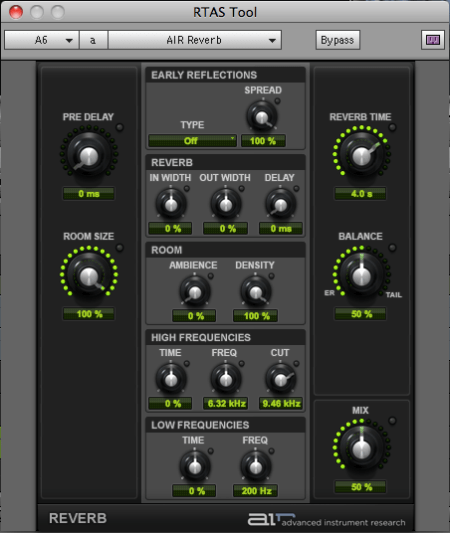
But despite these limitations, I’ve been using both features to good effect, mostly for editing music. The technique I’ve come up with is to dedicate two stereo tracks to temp music, and one to reverb. That’s right — a whole track to reverb — the same reverb throughout the show. For picture editors used to conserving track space, this seems almost absurd, but once you’ve wrapped your mind around it, it can be effective. End your music wherever you want, then cut the last beat to the reverb track. Voila — you’ve created a ring out. (In some cases, you’ll need to add short dissolves or fades to smooth out the transition.) Avid’s new AIR reverb plug-in, included with MC 5.5, is particularly good for this purpose. Unlike the old D-Verb, AIR reverb is more easily controlled and sounds better. You can simply set a duration (Reverb Time), measured in seconds. You’ll also want to adjust the Mix parameter, which controls how much of the original, dry audio is combined with the reverb (50% is a good starting point).


Avid could make some improvements to this situation. Automation for RTAS is essential. Likewise, the ability to edit RTAS effects when cutting from one sequence to another. And the AIR plug-ins, good as they are, include presets in Pro Tools, which are missing in MC. Finally, if we’re going to segregate stereo and mono clips into specialized tracks, then we need more tracks — 24, at least.

For more tips like this, check out my book, “Avid Agility,” available from Amazon.

Copy to Source Monitor

Posted July 27, 2011 by Steve
Categories: Avid, Avid Technical Tips

This won’t be new for some of you, but it’s a hidden feature and I use it so often that I thought I’d make mention of it.

Say you’re created a sound effect, or piece of music — anything you want to use again elsewhere. In other applications you’d Option-drag the clip in question, creating a copy at the destination of the drag. For some reason, Media Composer doesn’t support that standard operation. But it does offer you something that’s arguably more flexible: a quick shortcut to copy a selected clip or marked region to the source monitor. From there, you can edit it wherever you want. The shortcut, not visible in the menus, is Command-Option-C. Mark a region in the timeline and select tracks, or simply select a clip or clips. Then hit Command-Option-C. Your material instantly appears in the source monitor.

Note that if you copy selected clips they’ll appear with head and tail marks already assigned. That saves a couple of keystrokes. But if you marked a region instead, you’ll have to re-mark it in the source. Also note that if you select non-adjacent clips, MC will pad your selection with black, preserving their spatial relationship.

Here are two examples.

1. Copying clips.

Timeline before Command-Option-C:

Source Monitor after Command-Option-C:

2. Copying a region.

Timeline before Command-Option-C:

Source Monitor after Command-Option-C:

Did Apple Know What They Were Doing?

Posted July 26, 2011 by Steve
Categories: Avid, Avid Agility, Avid vs. Final Cut

For those of us fascinated by the evolution of editing technology, the Final Cut Pro X release is the gift that keeps on giving. Kanen Flowers has reinvigorated his long-dormant podcast, “That Post Show” (on iTunes), and the episode released yesterday covering FCP X a month after the launch, includes Mike J. Nichols, Paul del Vecchio, Peter Wells and Larry Jordan, talking about why the application is not for pros, at least not yet. But go to Apple’s FCP site and you’ll find the word “professional” everywhere, so much so that the whole thing seems defensive — a rarity  from Apple. The center of the page showcases four videos that highlight innovation in the program, again explicitly aimed at “professionals” and, shock of shocks, including screen grabs from the competition. Apple is feeling the heat, that’s for sure. They’ve damaged their biggest asset: the loyalty of their user base. Avid’s new management, by comparison, understands how precious that is (and current Media Composer users are a very loyal bunch).

The conventional wisdom right now seems to be that Jobs and Ubillos knew exactly what they were doing. They deliberately accepted the loss of the pro market in order to appeal to a much larger market. We may not like it, but it was a smart business decision — or so that line of reasoning goes. But I’m not so sure. Everybody makes mistakes, even Steve Jobs. Did the people at Apple really expect this much push-back? I’ve seen too many companies get stars in their eyes going after the Hollywood market to be confident that Apple is willing to write it off. I suspect that they want it all, and they still think we’ll come around. The question is whether the FCP X interface, which lacks a source monitor or bins, can ever be patched to work for people like me.

Apple has attempted to purify and clarify the editing model for a file-based era, removing anything that comes from film or linear tape. The source monitor — linear tape. Bins — film. EDLs — tape. Even in and out points are gone — again, they stem from the tape days. Frankly, I applaud that kind of out-of-the-box thinking. And there’s plenty of innovation in FCP X, innovation that I hope Avid and Adobe are busy copying. But Apple wins by taking chances, going where no one has gone before. And sometimes it goes to far. It sure seems like this is one of those times.

Let me end this post with a shameless plug. If you’re thinking about moving from Final Cut to Media Composer, you need my book, “Avid Agility.” MC is not a clone of FCP. Much of what makes it so powerful and responsive is hidden. The fastest way to understand why so many people think it’s the best way to edit is to get my book.

Dan Lebental talks to Debra Kaufman

Posted July 18, 2011 by Steve
Categories: Avid, Editors and Assistants

Debra Kaufman, who recently became the associate editor at Creative Cow Magazine, has posted a terrific conversation with editor Dan Lebental, who just completed “Cowboys and Aliens.” Interviews with editors can sometimes be pretty dull, but this one is different. Check it out here.

Avid Event in Burbank

Posted July 11, 2011 by Steve
Categories: Avid

With an aim toward reminding everybody that Avid is fully committed to its high end customers, the company will host an event at the Burbank Studios this coming Wednesday night, July 13th. CEO Gary Greenfield and COO Kirk Arnold will be on hand to listen to editors’ concerns and answer questions, along with many members of the design teams for Media Composer and Pro Tools. It’s a good opportunity to share your thoughts and get a sense of where Avid is going. There will be demos of the latest versions of MC and PT, and refreshments will be served. Doors open at 6:30 at the Steven J. Ross Theater on the Warner’s Lot. Details are here. Be sure to register in advance, it’ll probably fill up.