We’re all cutting more tracks these days and there just doesn’t seem to be enough screen real estate to manage them. Ever since the early 90s, the Media Composer has offered a way to maximize the size of the timeline window, but few people seem to know about it.
To shrink your source and record monitors and create a view something like you see below, simply click the button at the top right corner of the Composer Window. (On newer systems the green “maximize” button at the top left does the same thing.)
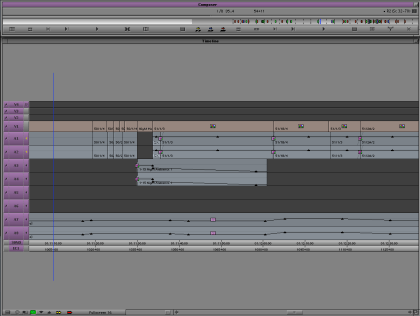
The images are gone from your source and record monitors, but nothing else has changed. All your editing controls continue to work as you’d expect. If your system includes a client monitor, I think you’ll find it easy to get used to this setup, especially if you’re working only on sound.
Once your source and record monitors have been been resized, you’ll want to adjust the size of other windows and then save this configuration as a Toolset.
First, have the system memorize your normal configuration, so you can get back to it. From the Toolset menu, be sure “Source/Record Editing” is selected and then choose “Save Current.”
Then select “Audio Editing” from the Toolset menu. The system will shift to a default audio editing view, and open the audio mixer. Your job is to customize this view until it suits you. The first step is to invoke the Mini-Composer. Click the green maximize button or the button at the window’s top right corner.
Then manually resize the timeline to fill the rest of the screen. And move your windows around until the interface is set up to your liking. If you prefer to see the audio tool then leave it where it is (you can even switch it to show 8 channels and have that memorized, as well). When you’re satisfied, select “Save Current” from the Toolset menu.

Now try out your toolsets. Select “Source/Record Editing” and you should see a normal display. Select “Audio Editing” and you’ll go to the magnified timeline.
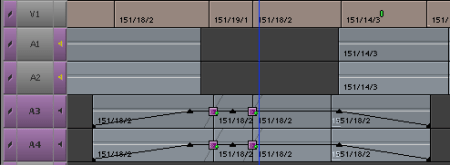
The final step is to associate a timeline view with a Toolset. That way, when you select “Audio Editing” you’ll not only see the enlarged timeline, but you’ll also switch to a track view that’s appropriate, with taller track sizes.
Just set up the timeline view as you normally would and memorize it by selecting Save As from the popup under the timeline.

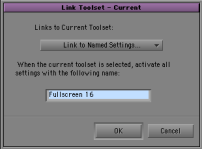
Then link that view to your Tooset. Get yourself into the Toolset using the Toolset menu. Then, from the same menu, choose “Link Current to…” In the dialog box that follows, type the name of the Timeline View you’d like to associate with that Toolset.
(You can always change your timeline view while working. All this does it bring up a specific timeline when you choose your toolset.)
That’s all there is to it. Now, with one menu pick you can shrink the composer, enlarge the timeline and enlarge your timeline tracks. And you can get back to where you were just as easily.


Recent Comments