Archive for the ‘Avid Technical Tips’ category

The Book Arrives

September 19, 2010

Today, I’m pleased to announce the release of my new book, Avid Agility. It’s the culmination of nearly two years of work, and represents a big fraction of what I know about about the Media Composer. Whether you’ve just upgraded to version 5 or or are still using version 4, I would humbly suggest that you need this book. There’s so much in it, so many tips and so much clear explanation, that I’ll wager that whatever your level of expertise, you’ll learn things from it that will be well worth your time. My first book became something of an underground classic in the early days of the nonlinear revolution. I hope this one will, too.

Long time Media Composer users will find detailed discussion of the new features in version 5, along with material about hidden features you may never have heard about. People who are relatively new to the system, or moving to it from Final Cut or Premiere, will find clear, straightforward explanations of basic Media Composer concepts and techniques. Fair warning: it’s not a beginner’s book, and it doesn’t cover everything. But if you’re looking to get more out of Media Composer, you should check it out.

The style is similar to this blog, so if you like the writing here, you’ll feel at home with the book. You’ll find chapters on timeline editing, visual effects, mixing, stereo audio and audio effects, trim mode, multi-camera editing, titles, color correction, film and film lists, settings, workspaces and lots more. Because so much of the MC interface is color-dependent, the book is printed in color. I’m especially proud of the illustrations, all 500 of them. Editors are by nature visual people and the images go a long way toward making the book easy to absorb and use.

In general, if you’re using Media Composer and want to get the most out of the system, this book is for you. It’s available now from the publisher, CreateSpace (a division of Amazon) and will be available through Amazon itself in a couple of weeks. I hope you get as much out of reading it as I did writing it. But most of all, I hope it helps you create work you’re proud of.
Purchase Avid Agility Here

Keeping Your Client Monitor in Sync

September 15, 2010

If you’re using an HD TV as a client monitor, you’re probably familiar with the dreaded “out-of-sync-on-the-big-screen” problem. This is the result of the fact that most consumer-level TVs introduce a video delay —  the time it takes the TV’s video scaling hardware to do it’s job. If you use the same TV at home, you’ll be listening to audio through the TV — and the TV contains hardware that delays the audio, as well, and keeps you in sync. But when such a TV is used in an editing room, audio is typically run through a mixer and big speakers and isn’t delayed. The result is a sync problem on the TV — the Avid’s composer window looks good, but the on the big screen audio is advanced relative to video, often by as much as two frames and sometimes more. What to do?

You typically have two choices: run your audio through the TV and then back out to your speakers, or purchase and use an audio delay box. Neither approach is ideal: running audio through the TV is awkward, limits you to two tracks, and may degrade quality, and delay boxes are fairly expensive.

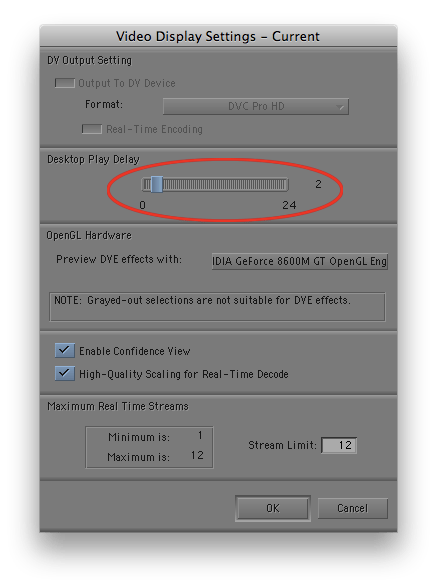
But there’s a third alternative that I discovered recently: Avid’s Desktop Play Delay setting. It was designed for output to a DV device where video and audio are delayed by the latency in the device. But it can also work effectively to put your Avid audio in sync with a client monitor. Just select a frame offset in the setting panel: the number of frames you enter is the amount audio will be delayed. You’ll have to experiment a bit to get it right: on our LGs, a two-frame delay seems best.

Sadly, you can’t be in sync on both the Composer window and the big screen, so you’ll have to choose — no delay for perfect sync on the Composer, or your preferred offset for perfect sync on the client monitor. I tend to leave the setting at zero when I’m working alone, but make the adjustment when I have people in the room, or when we’re screening. Also note that because this feature was designed for DV, it  causes video to jump when you press play or stop, by the number of frames you’ve selected. That’s not a show stopper, but it’s another reason to set the delay back to zero for the bulk of your work. There’s another quirk, as well: You can’t create two settings panels, one with an offset and one without, and then switch between them. For some reason, whatever you do to one panel affects the other.

But despite these problems, the Desktop Play Delay setting has solved a big problem in my cutting room. And if video didn’t shift on play and stop, I might leave it on all the time.

Four-Frame Display

September 6, 2010

When you drag clips around in the Media Composer timeline, the Composer window adjusts to show you what you’re doing. Instead of displaying the usual side-by-side images, it shows four frames: the A and B sides of the two cuts you’re adjusting as you drag. In some cases, this is super-slick and allows you to make quick and precise changes. But the fact that those video images have to update can slow down the drag, especially as it begins, and that can make editing this way feel like you’re moving through molasses.

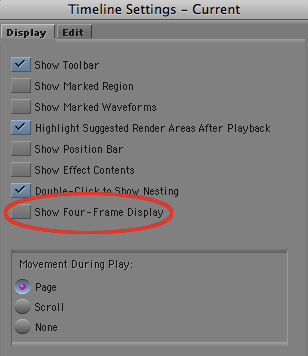
There used to be a way to suppress the four-frame display on a case by case basis. You held down a modifier key while you dragged and the images wouldn’t appear. We seem to have lost that in Version 5, but you can still turn off the four-frame display with a setting. You’ll find it in timeline settings. Deselect “Show Four-Frame Display” and you may find that timeline dragging is a lot more responsive.

Zoom Your Keyframe Graph

August 26, 2010

To properly control advanced keyframes, you need to see your keyframe graph clearly. Here’s an example. Let’s say you’re adding a push-in to a shot. You apply a resize effect, add a keyframe at the beginning and end, and increase the scaling at the tail keyframe. Then you play the effect. Instead of a smooth push from head to tail, your move starts slowly and comes to a stop at the end. What’s going on?

To figure it out, display the keyframe graph. It looks like this:

It sure looks like the zoom is continuous. But it’s not so. The problem is that your keyframe graph is so shrunken vertically that you can’t see what’s going on. The fix is to hit the Zoom to Curve Height button. This expands the display vertically to fill the graph. Now you can see what’s going on.

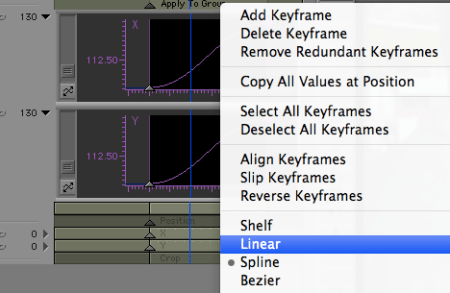
Advanced Keyframes default to spline interpolation — you get a smooth curve between keyframes, but motion stops at the beginning and end of the effect. In this case, you want Linear interpolation — the way traditional keyframes worked. Make your change by right-clicking in the Scaling track and selecting Linear.

The result is is a straight line between keyframes, and continuous motion head to tail. Now your push-in won’t stop at the end of the effect.

Stabilization on Steriods

August 24, 2010

Media Composer has included a very powerful stabilize effect for years now, but putting all that power to work was not easy. You needed significant training to get up to speed with it. (I posted a introductory video back in ’08 that should help. It’s here.) But now, with version 5, the stabilize effect is one-button simple. Yes, there are still lots of controls, but for most purposes, all you need to do is drag the effect to a clip and watch while it automatically tracks and stabilizes the shot, blowing it up as needed. You don’t need to identify a location for a tracker because the effect analyzes motion across the entire image.

With the default options, camera moves are preserved, but small jittery motion is eliminated (Avid calls this SteadiGlide). In most cases, that’s exactly what you want, and no further adjustments are required.

When it works, the effect can seem almost miraculous, fixing problems in an organic way that used to be impossible in a picture editing room. I’ve sometimes found myself checking the original shot just to make sure I’m not imagining the improvement. And best of all, the result plays in real time. No rendering needed.

Try it. I think you’re going to like it. It’s one of the best small features in MC5. You’ll find it in the image category.

Installer Love

August 22, 2010

It might seem strange for a person to want to yell “Eureka” during a simple software install, but that’s exactly what happened to me recently. Avid has always required you to uninstall before upgrading. And in the past you had to uninstall each of your Avid applications separately, and then install new versions one at a time. This was slow, prone to error, and just plain blockheaded. But with Media Composer 5.0.3, Avid has quietly updated the Mac install process, creating a single uninstaller and unified installer. The uninstaller searches for all your apps, finds them quickly, and with a single click, removes them. The installer is similarly fast and one-button easy, allowing you to install MC and all the helper apps simultaneously (EDL Manager, FilmScribe, etc.). Be sure to click the Customize button — that’s where you’ll find the helper apps.

Media Composer used to be maintained exclusively by trained technicians. Today, many editors own their own systems and do their own maintenance. The new install process is a small thing but it will make a big difference to that audience.

The next step, hopefully, is a combined installer/uninstaller, which checks for updates over the net and downloads them in the background. When that happens, you’ll hear an even bigger “Eureka” from my editing room.

Here’s the new uninstaller:

And the new installer: