Archive for the ‘Avid Technical Tips’ category

Toolsets & Workspaces Video

May 12, 2009

Avid’s toolsets and workspaces allow you to set up custom arrangements of your windows. You can turn windows on and off, change window sizes and positions and create various other customizations, and then invoke all of that with a single menu pick or keyboard shortcut. You can also select timeline (or other) settings simultaneously.

I’ve posted a video that shows you how to do it. (Note that these features were updated in MC6. This tutorial applies to MC5 and 5.5. )

Click below, or watch a larger version on Vimeo.

Advanced Keyframes Video

May 8, 2009

Avid’s advanced keyframes offer unprecedented control over visual effects in the Media Composer, but many editors don’t even know they exist. To help you get started working with them, I’ve put together a little introductory video tutorial. It’s about 13 minutes long. Check it out and let me know what you think.

Click below, or for a bigger image, watch it on Vimeo

24-fps Turnover to Sound

March 21, 2009

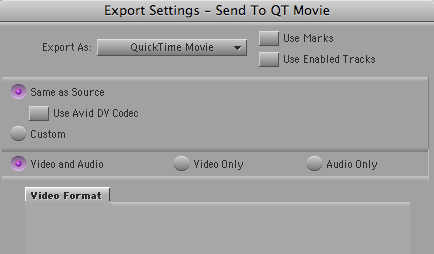
same-as-source-qt-export1In the old days, film shows turned over to sound via videotape and OMF. That meant sound got a 29.97 version of a show that was cut at 24, complete with the 3/2 telecine-style cadence inserted. It was an awkward and slow hand-over for both picture and sound.

Today, though most shows no longer deliver tapes to sound, many still create 29.97 Quicktimes, often for no better reason than, “it’s what we’ve always done.” But if you’re working on a 24-fps show, the easiest and simplest way to turn over is with 24-fps Quicktime.

Why are 29.97 QTs problematic? First, because creating a 29.97 QT from a 24 or 23.976 fps project doesn’t just mean introducing 3/2 — it means duplicating frames. That makes it awfully hard to cut sound effects precisely. Second, 29.97 QTs take a long time to make, wasting hours that picture assistants don’t have.

But if we turn over 24-fps Quicktimes, what settings should be used? And how should sound handle it in Pro Tools?

I’ve spent several days hashing this out with a music editor friend. I made a simple sync test: a head and tail leader with sync pops, separated by three minutes of filler and overlaid with an Avid Timecode Burn-In effect. From this I exported Quicktimes and OMFs, which my friend imported into PT. Then he added his own counters, compared them with mine and checked the pops. A pulldown sync error is about 1.5 frames per minute, so at the end of 3 minutes, if we’d screwed up, he’d be out by over four frames.

The whole thing is complicated by the fact that the Media Composer allows you to work in two kinds of 24-fps projects: “23.976p” and “24p.” The 23.976p project works like digital videotape. The 24p project works like film. (For details, see the post, Clarifying Avid Project Types. To figure out what kind of project you’re working in, go to the Project window and select the Format tab.)

Either way, you should select “Current” frame rate when you make your Quicktime. This will produce a Quicktime that is frame-for-frame identical to what you’re seeing in the Avid. (In a 23.976p project Quicktime will display a frame rate of 23.98, in a 24p project, it will display 24.)

Choose any codec that you and your sound editors prefer. But consider using the Avid codec. That’ll produce the fastest QT conversion, and your sound editors will see exactly what you saw in the Media Composer. You won’t need to fool around with Quicktime export settings, either. Just select “Same as Source” in the Quicktime Export dialog and you’re all set.

To play these QTs, your sound editors will need to install the Avid codec. Many sound editors don’t have this, but it’s a trivial download and a simple install. You’ll find the codec here. (Avid really ought to make it easier to find.)

In Pro Tools, your sound or music editors will work as follows: If you are working in a 24p project, they’ll run picture and timecode at 24-fps. If you’re working in a 23.976p project they’ll run picture and TC at 23.976. Either way, they’ll play back audio at 48K (or 44.1 in the unlikely event that you’ve been working that way in MC).

That’s all there is to it. If you take the time to create a test like I did (always a good idea), your sound editors will see the tail pop from your OMF line up with the tail sync mark in your QT, and their TC counter will line up with yours. They’ll see exactly the same frames you did in the Media Composer, and your exports will be quick and relatively foolproof.

New Avid Video Tutorials

March 11, 2009

Avid has begun to put up well-designed video tutorials for some of the new features in Media Composer. There are only a few so far, but they’re tight, effective and very useful. You can find them on this page, under the “Take A Tour” button. (Older tutorials are here.)

Assistant editors who aren’t familiar with the new timecode plug-in will find an excellent introduction to that powerful feature. You should note that the plug-in is even more powerful now, in version 3.5. It not only lets you burn in any numerical data that can be displayed above a monitor, but you can also add info from any bin column. For example, you can now easily make a tape that displays running timecode (24, 25 or 30 fps), keycode, tape roll and source timecode for every clip, as well as “property of” text — all in real time.

Congratulations to Lesley Glorioso, Michael Phillips and Steve Holyhead and for putting these tutorials together. Keep up the good work, folks.

Your Avid on the Mixing Stage

March 6, 2009

It’s rare to see an Avid on a dubbing stage. The conventional wisdom is that it’s not needed because everything has been turned over to sound and you’re (hopefully) not planning on any picture changes. The sound effects editors are going to bring an OMF copy of your cut and that’s supposed to be sufficient. In the past, it’s also been difficult to move your Avid, and that, more than anything, has ensured that we picture editors don’t come to the stage equipped with our gear.

But with the advent of MC software and big, inexpensive drives, that equation has changed. You can bring your entire project and all your media with you, and it turns out that this can have some significant advantages, namely access to your original cut, and to your track layout. So if you hear dialog that doesn’t sound right, or if a sound is missing, you can quickly figure out what went wrong.

Editors, producers and directors all fall victim to what we call “temp love” at some point. The mix you did in the Media Composer has been evolving for months and it’s inevitable that there will be some things that people will want to preserve. But recreating those things usually stops the mix cold and frustrates everybody. Being able to identify exactly what you want and where it is can be a big win for all involved.

Here are some tips:

  • You’ll create a drive with all your media on it. And it’s going to take many hours to do, even with Firewire 800. Don’t wait till the last minute.
  • Be sure to quit your Media Composer while you’re copying — otherwise the MC will see all that duplicate media, which is likely to cause problems.
  • If you’re running from Unity with many partitions, it’s probably a good idea to format your portable drive to mirror the Unity partitions. That makes it easier to confirm that you’ve got everything. It also makes it possible to let your portable drive double as a full media backup.
  • To confirm that you’ve got everything, you’ll want to use some kind of software comparator. A good and inexpensive solution is Compare Folders. You simply point the application at two folders and it tells you whether they match, and if not, what’s different. Sure beats the heck out of trying to do it by hand.
  • Unity creates individual folders for each user on every partition. But Media Composer software can’t see OMF media in those subfolders. This is a real pain and something Avid ought to deal with (MXF media works differently, which is one advantage of that format). The solution is to copy each partition with the subfolders intact, then color-code each folder and all the files within, and only then pull all the media out of the subfolders. You should also trash the indexes — the .pmr and .mdb files. Sort by “kind” to find them.
  • Once you’ve got your media copied properly, you’ll want to “flight test” it on your laptop. Be sure to allow time for this. Copy your project to the laptop, connect the drive and start up the MC. Each partition will be indexed. This can take several hours.
  • If all goes well, your entire project should be on line. To confirm it, select Clip Color > Offline in the timeline popup menu. (And turn off everything else in that submenu — different coloring options can interfere with each other. See this post for details.) Then open each sequence of your cut show. You should not see any red clips.
  • If you have two copies of your project, make sure you know which one you’re working from. If you copied your project partition to the portable drive, you’ll have one there, and probably should use it. But you also may have one on the laptop’s internal drive. Changes in one won’t be reflected in the other.

That’s way too many potholes for something that ought to be simple and routine, and Avid really needs to take another look at simplifying media copying (more at this post). But even with all the hassle, having your Avid on the stage can be a big advantage and well worth the effort.

EditCalc

February 24, 2009

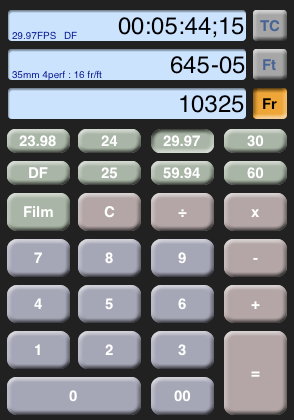
editcalcEditCalc is a new timecode and feet+frames calculator for the iPhone and iPod Touch. I’ve only had a quick look at it, but it seems quite polished, and it handles just about any frame rate or film gauge you can throw at it, including 16mm, 35/3-perf and 70/5-perf.

It does simultaneous conversions while you work — do a calculation in the time, footage or total frame fields and the others update live. It supports a wide range of video frame rates, along with drop and non-drop TC. You can also see a history of previous calculations, so you can check your work. The Avid calculator will do some of the same things, but it’s not as slick or well thought out.