Archive for the ‘Avid vs. Final Cut’ category

The Zen of Trim

April 20, 2010

I had an interesting debate with a music editor friend the other day. Frustrated (as we all are) with the hoops you have to jump through to move material back and forth between Media Composer and Pro Tools, he suggested that MC simply start using Pro Tools as its audio engine. And not just the engine — the whole UI. MC just synchronizes with PT. End of story.

I completely agree with the need to move sequences/sessions and media back and forth without conversion. But much as I envy the Pro Tools toolset (as I describe in this post), I don’t want to rely on the PT interface. Why? Because I’d have to give up Trim Mode.

My friend wouldn’t have it. “I can do anything you can do,” he insisted. I tried to explain that he can’t trim while watching picture or listening to sound. He said he didn’t need that — he just drags things around and hits play to check the work. Or he trims using PT’s trim tool. No problem staying in sync.

I wasn’t making any progress, so I finally pulled out the laptop and made a single dialog cut. My point was this: Most of my cuts are overlapped. When I adjust picture, I usually want to adjust sound somewhere else to stay in sync. With MC, I can trim all parts of an overlap while playing and watching any one of them. When I stop, I’m done. The ability to see realtime video while the cut is made, and to observe what’s happening at any part of the cut, audio or video, a-side or b-side, while keeping everything else in sync, is something I can’t get anywhere else. Not to mention the ability to do asymmetrical trimming, or trim two heads or tails, slip or slide, etc., all while watching, or listening to, any portion of the cut.

I had to show it to him three times. Each time he scratched his head, thought for a minute, and said, “well, I can do that, too.” And I kept insisting that he couldn’t. Finally, on the third go-round, came the reply, “Lemme see that again.” And then, finally, “Wow — I guess that IS pretty cool.”

His conclusion? Digi should add a trim mode and then Avid could merge the two UIs. My conclusion? Video and audio editors need different tools.

The discussion also gave me new insight into the other major editing applications, and how difficult it is to explain the power of Avid’s trim model to somebody who’s never really used it. I know, I know — plenty of people have switched from MC to FCP and have never looked back. But for a lot of us, trim mode is the holy grail. If I had to, I could work without it — I just don’t ever want to.

NAB in the Rear View Mirror

April 19, 2010

What a difference a couple of years makes. Avid (and Media Composer 5) picked up several awards at NAB, including a Videography Vidy award, a Pick Hit from Broadcast Engineering, and a Star Award from TV Technology. Not bad for a company that a lot of people thought was moribund a few years ago. Apple, of course, was a no-show at NAB, and the Final Cut community seems to be taking notice. Here’s a quote from the Los Angeles Final Cut Pro User Group forum: “I hope Apple takes this as a wake up call. Because Avid is making FCP seem like the Media Composer of five years ago…”

Oliver Peters offers a great summary of post production-related NAB news on his blog here. I was intrigued to see that some of the new digital cinema cameras generate both raw files and either DNX or ProRes simultaneously. We thought the lab would end up in the editing room. Maybe it’s actually going to end up in the camera. And later this year, it looks like Lightworks is going to have a new life as a free download, with the code released to the open source community. The modern Lightworks has plenty of useful features, not the least of which is background saves. And it can edit both ProRes and DNX without transcoding. Don’t count them out yet. Meanwhile, as I’ve mentioned  previously (here and here), Premiere might be morphing into a legitimate contender.

Not long ago it looked like the editing software wars were nearly over. Today, the playing field is a whole lot more level — and exciting.  This is how it’s supposed to work. Competition drives innovation — in economics, and in evolution. And we, the editors, win.

MC Audio Dissolves Come in Two Flavors

January 13, 2010

Have you ever created an audio dissolve and heard an audible volume dip in the middle of the effect? Perhaps when you’re trying to join two similar pieces of fill? If it’s happened to you, you know how maddening it can be to eliminate. Final Cut offers a neat solution: two kinds of audio dissolves, one of which raises the level in the middle of the effect by 3 db. Audio editing applications typically permit even more choices.

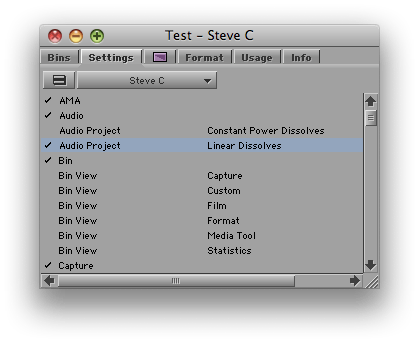
It turns out that the Media Composer offers a choice of dissolve types, too. But the feature is hidden in a setting and barely mentioned in the docs. I had thought it altered all dissolves, including the ones you’ve already made. But in fact, it affects new dissolves only; old ones are left alone. The setting is labeled “Dissolve Midpoint Attenuation.” You’ll find it in the Effects tab of the Audio Project settings panel. Similar to Final Cut, your choices are Constant Power, which adds a 3 db boost in the center of the dissolve, and Linear, which is the default.

The trouble with this implementation is that it’s hard to quickly alter an existing dissolve and compare options. And you have no indication in the timeline of the type of dissolve you’ve created. FCP allows you to change a dissolve type with a contextual menu pick, and it labels each effect in the timeline.

But while not ideal, in practice you can make the MC method work. Simply duplicate your Audio Project setting (select it and hit Command-D). Then open each setting by double-clicking, adjust one to be Constant Power and the other Linear, and name them appropriately. Once you’re created these settings, you can quickly switch between them by clicking in the area to the left of the setting name (putting a check mark there).

You probably want to let Constant Power be your default. For most dissolves, it’s more likely to produce a smooth transition. For fades, you may prefer the Linear setting.

I’m wondering whether readers here have used this feature. It was a new for me and I’m curious whether you’ve tried it and how it’s worked in practice. Please share your impressions in the comments.

Final Cut User Group Videos

December 12, 2009

Video from the LA Final Cut Pro User Group meeting I spoke at is now available for download via the Open Television Network. The meeting covered new features in MC 4.0 and featured presentations from me, Walter Murch and Shane Ross. Details are in this post. The video has been divided into three parts, one for each of the presenters. It’s not free, but the prices are minimal and the quality is excellent. Go to the LAFCPUG page on the Open Television Network and enter your credit card information. Click the link to subscribe to the feed via iTunes. Buttons for all recent episodes will appear in the iTunes podcast page. Take a look at the free previews or download each segment in full. It sounds like a hassle, but it worked well for me and only took a minute or two. You’ll get a signup discount of $5, so watching all three parts will cost you a whopping $2.47.

Avid at the FCP User Group

November 19, 2009

I spoke at a very interesting meeting of the LA Final Cut Pro User Group last night, along with Walter Murch and Shane Ross. Walter talked about moving back to MC after years with FCP and described in fascinating detail the relative merits of each application. Shane went over Avid Media Access, which makes it possible to work with file-based media without conversion, and offered an impressive demo of Avid’s Mix and Match capability, putting all kinds of material into a single timeline and playing it without a hiccup. I gave a brief introduction to Transition Preservation, Advanced Keyframes and Trim Mode, and I tried to convey my sense that Avid is a renewed company that is innovating aggressively. In other words, there was plenty of substance to chew on.

For me, the main takeaway was that the world is becoming a lot more balanced. A couple of years ago the Final Cut community was unanimous in its disdain for all things Avid. Last night was far more open. There was a powerful sense that both applications are worthy of consideration, that they have different strengths and weaknesses, and that newbies would be well advised to know both.

This can only be good for us as editors. Our internecine rivalries can be fun, but we should always remember that regardless of the tools we use, our shared goal is to create beautiful and compelling cinema, to shape space and time, to move audiences. We may prefer one tool or another, but the big win is that we have a choice. These applications aren’t finished — there’s plenty more to do. And as the manufacturers leapfrog each other, we editors can only benefit. I hope to see more events like last night, where content is king and bias is minimized. I learned a great deal, and I hope those of you who were present did, too. Please share your comments. I’m eager to know what you thought.

My special thanks go to Mike Horton, the heart and soul of LAFCPUG, for hosting this meeting. The group is a terrific resource and a critical part of the Los Angeles editing community. Video will be uploaded soon at this page on the Open Television Network and I’ll link to it when it’s available.

The Pros and Cons of Fast Scrub

October 26, 2009

If you’re using Avid’s new DX hardware (Nitris or Mojo), then you’ve probably been using “Fast Scrub,” perhaps without knowing it. This is a slick new feature that makes the timeline more responsive, by dramatically improving the number of frames displayed as you drag. Fast Scrub offers some of the smoothest timeline performance in the business — so smooth that you can often check your work just by dragging through it. It also improves audio responsiveness, especially if you keep the caps lock key down. (I don’t, but I know many of you do.) If you’re using DX hardware you’ll find it in Timeline settings. It’s turned on by default.

But if you like to leave waveforms on — and I can’t work any other way now — then Fast Scrub will make you crazy. Why? Because it causes waveforms to redraw much too frequently, even when you are just manipulating video. If you simply move a video clip in segment mode — with no change to any audio — all your waveforms, for your entire timeline, will slowly redraw, during which time you can’t do anything but wait. Many other seemingly innocuous things will also trigger a redraw. Undo will usually do it, for example. I’ve even seen redraws after simply changing a clip name in a bin.

With a fast CPU, waveform display in the Media Composer has become very usable (and waveforms in MC have always been much more detailed than in FCP). But with Fast Scrub you have to turn waveforms off, or keep a straight jacket handy.

Okay, so why not just disable Fast Scrub, itself? Timeline dragging is plenty responsive with software-only systems or even with Adrenaline, so turning it off  shouldn’t be a big deal. Unfortunately, with the DX hardware and Fast Scrub off, timeline dragging goes back to the way it was before version 3 — very slow. So you’re damned either way.

Caught between a rock and a hard place, I’ve had Fast Scrub off for a week or so now, and I’m getting used to it. But I sure wish the timeline could be as responsive as it is on my laptop at home.