Archive for the ‘Avid Technical Tips’ category

Cut and Paste, Avid Style

August 31, 2007

Final Cut relies on cut and paste in the timeline and that can be a very useful convenience. But these days the Media Composer is no slouch when it comes to timeline manipulation. And because the MC allows you to patch one track to another, it is arguably more flexible and intuitive. One helpful trick is to use the “clipboard contents” button.

Clipboard Contents

I put it under the source monitor, so it’s always available. Got a clip (say, a sound effect or a piece of sound fill) that you want to use elsewhere? Select the track, mark the clip and hit command-c. It’s now in your clipboard. Then just hit the clipboard contents icon to bring it into your source monitor. From there, you can use it any way you like (and cut it into any track you like via the patch panel).

Technorati Tags: , , ,

Settings Galore

August 22, 2007

The Media Composer just keeps getting more flexible and powerful. But with all this flexibility comes complexity. And good as Avid is at making the machine do whatever we might desire, it often fails when the time comes to explain those capabilities. Without the explanation, the power isn’t worth all that much.

I’m starting  new show with Adrenaline machines, using the latest software, Quad-core G5s and Unity. First impressions — very fast. Probably the most responsive Avid I’ve ever used. And a far cry from the early, and very buggy, Adrenaline machines I’ve used in the past.

But there sure are a lot of settings to pay attention to. Many are hidden. Most are unexplained. Here’s a basic example: Media Creation. When you digitize you can now create MXF or OMF files. MXF is the default. Want to make OMFs? You need to do a little searching. Turns out the choice is in the Media Creation setting pane — in two places. First use the last tab to select your “Media Type.” Then select your actual resolution in the Capture tab. And if you want to create AIFF audio files instead of WAV, you’ll need to locate another setting: “Audio Project.”

Media Creation Settings 1

Media Creation Settings 2

Audio Media Setting

Then there are the “Film and 24P” settings. I can guess what they mean, but it sure would be useful to actually know what they mean. The help system tells us little more than to select the settings you want.

Defaults and settings have been a bugaboo of the Media Composer since the early days. They’ve been responsible for a lot of problems. If you set up your project incorrectly you pay for it later.

Avid needs to add some explanatory text to these settings panes — text that is vetted by real editors to make sure it conveys the meaning intended. A little money invested here might save a lot of money on customer support.

Technorati Tags: , , ,

DNXHD-36 Without Adrenaline

July 26, 2007

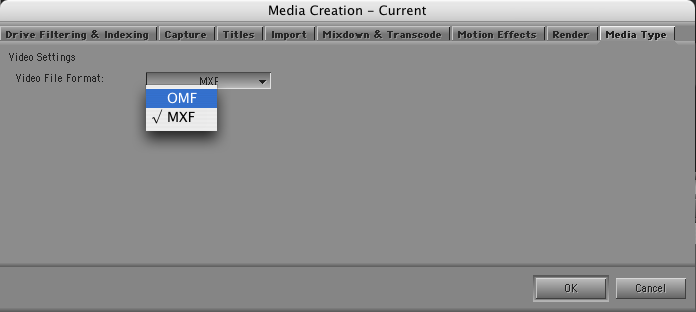
I got a demo yesterday of a software-only Media Composer playing DNXHD-36 media. We hooked up an 8-core Mac Pro to a big Pioneer plasma TV that served as our second monitor. In a word, it was fantastic. Seeing material with that kind of clarity at that size in an offline editing room, and being able to play it and work with it quickly, jogging back and forth and dragging through a clip, was downright breathtaking. And it was not just an aesthetic experience, although it was that, for sure. You’re getting more information — for example, you can clearly see facial expressions in wide shots.

Major caveat — all I did was look at a couple of clips a few minutes long. I didn’t try to play huge complex sequences, I didn’t run a big project, I didn’t even have much audio. All I did was use JKL to move around in the video, made a few cuts, tried making a Quicktime and a cut list. In that limited environment, the system was quite responsive.

Special thanks go to Jeremy Dela Rosa at Global Entertainment Partners (GEP) for putting the demo together for me.

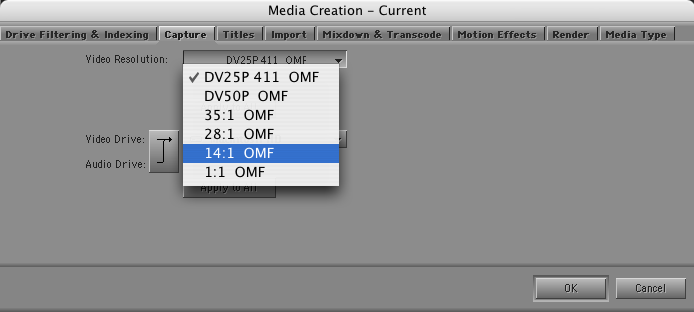
The big revelation was that we could do this with a software-only Avid. You don’t need Adrenaline to do HD, and you don’t need huge amounts of storage. DNX-36 uses about 16 GB per hour at 24 fps — just a bit more than DV, and about triple what you’d need for good ol’ 14:1.

So can you really use a software-only system instead of Adrenaline? That depends on what you are trying to do. The first problem is monitoring. We ran the system with two monitors, one of which was the HD TV (the TV has to have a DVI input). That might be a viable way to work — if you had a 30″ monitor for cutting, you could put everything there, bins, composer and timeline. But if you want three monitors, you’re moving to the bleeding edge. You’d install a second graphics card in your Mac, and run your bin monitor from that. We didn’t have that second card, so we weren’t able to try it. Avid doesn’t officially sanction it, but it ought to work.

The second problem is input and output. The software system has only one way of doing this — Firewire. And that severely limits your choices: DV or DVCPRO HD. If you’re working at DNX36 that doesn’t help much.

So a realistic environment for a small show might mean an Adrenaline-based system for the assistant and a software-only system for the editor.

We tried a few other things:

Making an SD Quicktime — something you might have to do for turnover to sound. On the 8-core Mac, creating a 640×480 QT at Motion JPEG-A was very quick — a bit faster than real time.

Playing SD material in the HD project. The only way to do this is to create a separate SD project, load your video there and then drag the bin into the HD project. In the time we had, all we could do was create some color bars at DV resolution. I was not only able to play that in the HD project, I could intercut it with HD. Unfortunately, the MC insisted on treating the SD clip as though it were 16×9, so it looked anamorphically stretched. But adding a reformat effect solved that problem, and the effect played without rendering.

I also tried making a cut list. And, not surprisingly, I ran into some new bugs. FilmScribe is not nearly as stable as it used to be. Lists out of MC used to handily beat those from FCP. I don’t know if that’s true anymore.

I heard about some other problems, too:

In Adrenaline you can output to SD with a pillar-box in real time. But you can’t do it with deck control. In other words, you can’t use digital cut, you can only crash record. That makes creating an SD tape pretty dicey and not particularly useful.

Worse, I was told about a bug in Adrenaline, that puts a delay into video on the client monitor. The result is that you can be in sync on the client, or on the record monitor, but not on both. The delay is four to six frames — not trivial. I didn’t see this myself, but I sure hope Avid engineering is doing whatever they can to fix it — pronto. The good news from my demo is that the problem only occurs with Adrenaline. Software only was in perfect sync.

All in all, an eye-opening couple of hours, and a lot of food for thought.

Technorati Tags: , , ,

More Scroll Wheel Tips

July 19, 2007

Avids now make much better use of a mouse with a scroll wheel. But many editors don’t know it. I’ve mentioned this before, but thanks to Greg Staten at Avid, I’ve discovered a few additional uses for your favorite computer rodent.

  1. You can use the scroll wheel to move up and down through text view bins, the project window, or the timeline. The scroll wheel is much more sensitive now and works the way you expect. And the sensitivity can be adjusted through the mouse settings panel.
  2. If you hold down the control key and scroll through a bin in text view you will move horizontally through the columns.
  3. If you first select a clip and then hold the control key down and scroll through a bin (in text view), you’ll move vertically through the list of clips, selecting individual items in turn. When you’ve got the item you want, hit return to load it into a monitor. Add the shift key and you can select more than one item. (This also works in frame view, but it’s hard to control.)
  4. If you use a mighty mouse or trackpad, you can scroll horizontally in the timeline. This moves the timeline to the left or right. This is a terrifically useful feature, but it’s marred a bit by the fact that scrolling works backwards relative to other programs (try it to see what I mean).
  5. If you hold down the control key while you’re scrolling horizontally in the timeline, you’ll move the blue bar a frame at a time. Hold both control & alt and you move by ten frames.
  6. In effect mode or color correction mode, you can select a slider or control point and, with the control key held down, change its value by scrolling. Add the option key and you’ll change values by ten instead of one.

All in all, very useful and intuitive.

Technorati Tags: , , ,

Tab Between Open Windows with Witch

July 2, 2007

Witch Screen Shot

Thanks to a suggestion from Mark Burton (on this page), I’ve been experimenting with a little OSX utility called “Witch” for the last week or so — and I like it a lot. It allows you to quickly switch from one window to another, much as you now switch from one application to another using command-tab.

With Witch installed, you switch between windows with option-tab (or whatever keystroke you prefer). If you hit it once, you go to the last window you used; if you hold it down you can choose from a menu of open windows. It’s simple and intuitive, and on a laptop Avid, where screen real estate is at a premium and overlapping windows are the way to go, I find it really useful.

Witch is free, but if you like it, send the author, Peter Maurer, a donation.

Technorati Tags: , , , ,

Home Movie Gotchas

June 5, 2007

Now that I’ve got a software Media Composer running at home, I’ve been trying to use it to edit some home videos. And therein lies a tale. The material in question was shot with a Panasonic PV-GS120, a nice little consumer three-chip DV camera, and I used the camera as a deck, as well. I’ll try to summarize what happened below. Relevant error messages and screen shots are included.

First problem: disk space.
There’s a serious bug (in the capture tool?) that can cause the MC’s temporary “creating” files to balloon and fill up your disk. One minute I had 20+ gigs available on the drive, the next minute it was completely full. I don’t know exactly what caused this to happen but it occurred several times.

Creating

This is a big problem in itself, but it’s compounded by the fact that the MC can’t cope with a full disk. When your disk fills up you’ll soon be looking at a perpetual spinning beach ball — but you won’t be able force quit. The first force quit doesn’t even make the Media Composer disappear. Repeated attempts eventually dismiss the interface, but something hangs around, because when you go to the Finder and try to delete the “creating” files you discover that they’re in use. The result? You can’t even shut down the computer. The only way out is to hold down the power button to force a restart. I had to do that four times this weekend, and believe me, it got old. This is with a 1.5 Ghz G4 Mac laptop. I can’t remember the last time anything crashed on it.

Force Quit

Second problem: sync.
I discovered that if I digitize without selecting the timecode light, when I play back a long clip, sync will drift. Hitting stop and start again during playback fixes the problem. If I digitize with timecode, things seem to be okay.

But even when I captured with DV timecode, media still came in slightly out of sync. In frustration, I finally grabbed a slate and shot some tests, examining the digitized media frame by frame against an audio waveform. Avid lets you introduce an audio delay during digitizing. If I set it to one frame, audio comes in slightly ahead of where it should be. If I set it to two frames, it comes in late.

Third problem: logging.
This being consumer DV, I naturally tried digitizing without logging the tape. When you hit the red capture button the MC does the right thing — it starts playing the tape and digitizing at the same time. But when video runs out, it acts like there’s been an error, tells you that your media may be no good, and asks if you want to keep it. Of course I do! Every tape runs out — this isn’t an error!

Capture Aborted 2

So I tried logging the tape and batch capturing, instead. But here the MC gets hung up on whether the tape has drop or non-drop code. If I just do a crash digitize it tells me the code is non-drop. But if I log a tape that way and try to digitize, it tells me the tape has drop-frame code.

Drop Vs Nondrop

The solution is to log the tape and then modify the clip to drop frame. But even then the MC has a terrible time finding the start point of a clip. I have to cue the tape by hand and get very close or it won’t cue up.

More Problems
When the MC sees the camera/deck it controls it just fine. The trouble is that it often doesn’t see it. Sometimes you can solve the problem by selecting “auto-configure” from the deck pop-up in the capture tool. But often you have to restart the MC. Not fun. Another glitch: the MC defaults to a maximum clip length of 30 minutes. Until I figured that out and reset it in capture preferences, I couldn’t digitize whole tapes.

There were other problems, too. Here are a couple of other error messages that I saw. I can’t remember the exact circumstances anymore.

Digdverror

Transfersamples

Bottom Line
The procedure I finally settled on was: turn the deck on and wait a bit before starting the MC (to make sure it sees the deck), set the maximum clip length to 90 minutes and the audio delay to one frame, and do a crash digitize with timecode. I ignored the error message that appeared at the end of the reel, and scrupulously checked the size of the “creating” file after every tape was captured. That worked fairly reliably. But it sure took a long time to come up with that formula.

For what it’s worth, lil ol’ iMovie does a whole lot better. It loads complete tapes every time without ever complaining and without any configuration hassles. But, of course, you get non-standard media and your editing controls are very crude.

Technorati Tags: , ,