Archive for the ‘Avid Technical Tips’ category

Tip #9 – Scroll Wheels

November 22, 2006

Later versions of the Media Composer and Xpress finally make decent use of a mouse with a scroll wheel. Many editors don’t know this because they are using older mice that don’t have them, but the scroll wheel is great for moving quickly through large bins, navigating in the project window, or even scrolling up and down through your tracks in the timeline. Even better, if you have a scroll wheel that functions in two dimensions you can use it to move the timeline left and right. Apple’s standard Mighty Mouse works well for this purpose — the scroll wheel is a little ball that can go up and down or left and right.

Recent Apple laptops have trackpads that allow you to scroll by dragging two fingers on the trackpad surface. If you don’t have that capability you can create scroll areas on the side and bottom of the trackpad with a piece of shareware called SideTrack. I’ve been using it for several months and like it a lot. (Apple distributes something called FFScroll which allows older machines to do a two finger scroll, but I haven’t tried it.)

Scrolling in the timeline is instantly addictive because the scroll wheel produces a result that’s proportional to the amount of turning you do. Clicking and holding on an on-screen button is ‘dimensionless.’ You have to watch the result to see how far to go. But with the scroll wheel, your input (how far you roll the wheel) and the output of your action (the movement of the timeline) are proportional and that means you can do it with less conscious attention. It feels more organic, more like an extension of your body.

However, I still prefer my favorite mouse, the venerable Microsoft Intellimouse Optical (available at Amazon), because I can program the right button to be a double click. That one feature has eliminated a persistent pain I had in my forearm and has probably saved my wrist. But the Intellimouse has an ordinary scroll wheel, and that means I can’t use it to scroll horizontally.

For that and other reasons, I wish Avid would go a step further and add a setting that would allow us to control a scroll wheel. It would be great to be able to use that up and down wheel, in the timeline, to move left and right. And it would also be great if we could adjust the sensitivity of the scroll wheel. I can set the sensitivity in System Preferences, but unlike every other program I’ve got, the Media Composer ignores it. Windows always scroll at the same speed no matter what you do and often that speed is too slow.

And last but not least, it sure would be wonderful if we could scroll the timeline while video continues to play.

Tip #8 – Cut and Paste in the Timeline

October 30, 2006

This won’t be news to some of you, but over the years Avid has made it easier to cut and paste clips in the timeline. Not everybody is aware of this feature and it may appear quirky, but in certain situations it can be a godsend. For example, if you need to make a series of similar titles, just make one and copy and paste it where you want the others. Then simply change the text on the copies. All the formatting remains intact.

Here are a few pointers:

Copy obeys tracklights and marks. So first select the tracks you want to copy, then mark the timeline where you want the copy to start and end. Then select Command-C. The material you’ve marked goes to the clipboard.

But paste (Command-V) doesn’t obey marks or tracklights. When you paste, whatever was in your clipboard is inserted at the blue bar position, regardless of where your marks are, and in the same track(s) from which it was copied. A paste typically works like an insertion, a yellow edit. That generally isn’t as useful as an overwrite (red edit). To do that, you must select red segment mode before pasting.

If you want to paste copied material into a different track, you have to put your copy into the source monitor, patch your tracks, and insert or overwrite. In Media Composer the easiest way to do this is by selecting “Clipboard Contents” from the menu above the source monitor.

Clipboard Contents Menu Pick

Xpress doesn’t include that menu item so you must use the command palette to do it. The button is in the Edit tab and is called “Clipboard Contents.” Put it under your source monitor and click it to load whatever you’ve last copied.

clipboard_contents1.png

Even simpler, you can copy something from the timeline directly to your source monitor simply by marking it, selecting tracks and then option dragging from the record monitor to the source monitor. Voila, you’ve got a copy of that material, ready to be edited somewhere else. But note that this feature broke at some point and could corrupt your timeline. I’m told that it’s fixed now, but you should use it at your own risk.

Finally, note that every time you lift or extract something, a copy of the material automatically goes to the clipboard. If you want to use it somewhere else, just paste it directly or load it into the source monitor.

______________________________

Wish list:

  1. In most Mac applications, including the Finder, you can duplicate an item by option-dragging it. A copy is created wherever you end the drag. Pro Tools allows you to do this in the timeline, and sometimes it sure would be great if the Media Composer did, too.
  2. Allow the editor to choose the type of edit a paste defaults to. I almost never want an insert. I almost always want an overwrite.

Tip #7 – iTunes for Music and Effects

October 7, 2006

iTunes_soundtrack

If you work with temp music and effects and you haven’t started using iTunes as an adjunct to the Media Composer, you owe it to yourself to try it. Once you get used to the way it works, I think you’ll wonder how you got along without it. It’s great for two reasons.

First, iTunes makes it very easy to organize your sound effects and music. Most of the commercial sound effects libraries are now part of the Gracenote database, so when you load those CDs into iTunes the tracks get labeled and organized automatically. Once your effects are loaded, you can easily do a keyword search and find everything with the word “splash” or “gunshot” or “wind” in the description and listen to them with a simple double click. (Unlike the MC, iTunes keeps playing even as you move around in a clip, which makes it great for browsing.)

Second, iTunes can play things simultaneously with the Media Composer. This makes it a terrific tool for experimenting with temp music. You park the MC at the beginning of a sequence where you need music and press play. Then switch to iTunes and press play there. You are now playing music against picture, and you can move your cursor around in iTunes or the MC and try different synch positions easily. This is much quicker and easier than trying things out using CDs or, worse yet, within the MC itself.

Here are some tips that will make this process easier:

You don’t want to have to listen to iTunes through the tiny speakers on your computer. So make sure that the audio output of your Mac or PC is routed through your mixer. Then you’ll be able to adjust the level of iTunes just as you would a CD player.

Even though the Gracenote database now gets most CD tracks labeled correctly, it does make mistakes. Be sure to check the labeling, including the “genre.” You want scores labeled “Soundtrack” and sound effects labeled as “Sound Effects.” That’ll make it a lot easier to find things later.

Be sure you load your material into iTunes in an Avid-friendly way. The Media Composer won’t import “variable bit rate” MP3s, nor will it accept AAC-encoded files. So you must load iTunes using the MP3 encoder, preferably at a high bit rate, like 192 kbps. Better yet, load your audio as AIF files, which aren’t compressed at all. This takes up the most space but yields the highest quality. You’ll find these settings in the iTunes Preferences under Advanced > Importing.

Most important, the MC won’t import from iTunes directly. You can’t drag and drop from iTunes into an Avid bin. This is frustrating, and I hope Avid engineering will do something about it, but there’s a fairly simple workaround. Just drag from iTunes into folder on your desktop first. This creates a copy of the sound file and leaves the original in iTunes. Then drag that copy into a bin.

Once the file has been successfully imported into the MC you can delete the copy from the finder. You also probably want to adjust the level of the source file in the MC. For some reason, things that play properly in iTunes will come into the MC much too loud.

Finally, I suggest that you tell the MC to sample rate convert your audio during input. Though the system will now play any sample rate in the timeline, it will insist on rendering these files when you attempt to make a digital cut. That’s awkward and messy. It’s easier to let the MC do all of that during input. You’ll find these settings in Import Settings > Audio.

Once you start using iTunes for work, you may find yourself wanting to create more than one iTunes music library. Check out the program Libra. It does a good and simple job of helping you switch from one library to another. You’ll find it here: http://homepage.mac.com/sroy/libra/

Tip #6 – Enlarge Waveforms

September 28, 2006

The Media Composer still doesn’t display audio waveforms fast enough, but speed has improved considerably over the years and I now leave them on quite often. One problem that comes up regularly is that quiet sources can be hard to see unless you make your tracks tall, which hogs screen real estate.

The trick is to enlarge the waveforms only. Just select the track and instead of hitting command-l, which enlarges the track, hit command-option-l. The waveforms get taller, but the track size remains the same.

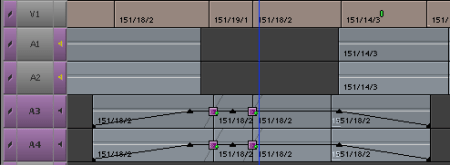
Here’s a section of a timeline with waveforms displayed. The audio is so soft you can’t see anything.

normal_waveforms.png

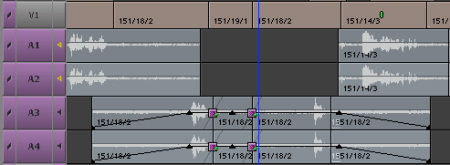
Here’s the same section after hitting command-shift-l a few times:

big_waveforms.png

Voila, you can see!

To shink the waveforms again hit command-option-k. To get your waveforms back to standard size hit command-option-k several times, until they won’t shrink any further.

Tip #5 – Extend Trim View

September 20, 2006

I do an awful lot of assymetrical trimming, especially when after I’ve started to build sound effects and music into a sequence.

After a cut is trimmed this way, I naturally hit play transition to look at it. But sometimes that isn’t enough. I need to get a longer run at the cut to evaluate it — go back a few shots and play from there. To do that I have to exit trim mode, check the cut and then, if I don’t like it, I have to set up the trim again, which can be time consuming.

There are two ways around this. One way is to use “recreate last trim.” This puts your rollers back where they were the last time you were in trim mode. You invoke this by holding down the option key and hitting the trim mode button. So you’d make your trim, exit trim mode, check the cut, and then return to trimming by hitting option+trim.

But you can also simply move one roller and fool trim mode into playing more of your timeline than it would otherwise.

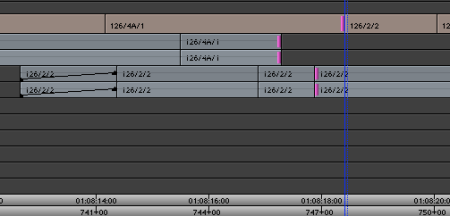
Here’s a typical assymmetrical trim:

Normal Trim

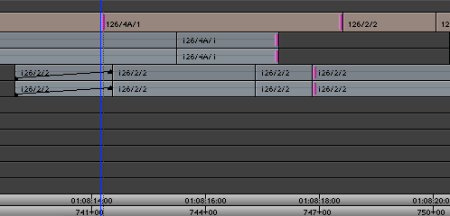
But let’s say you want to see the entire previous shot play before coming to the cut you’ve been working on. Easy — just add one more roller, by shift clicking on an earlier picture cut, like this:

Extend Trim View

Now the Media Composer plays from before the first picture roller to after the second one. When you’ve seen what you need, deselect that roller by shift clicking and you’re ready to make additional changes.

Tip #4 – Trim to Fill

September 17, 2006

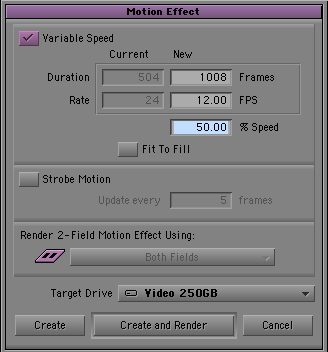
Most of us have been making our motion effects the old fashioned way, using Avid’s trusty “Motion Effect” dialog box. This is reliable and predictable, especially for work that has to be reproduced on film with an optical camera. But today, most of us are working in environments where effects get conformed digitally, and that means we no longer have to restrict ourselves to integer speeds (1/2x, 2x, 3x, etc.).

Standard Motion Effect Dialog Box

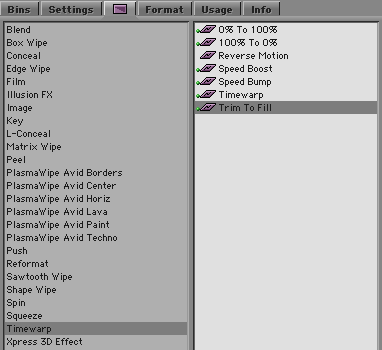
The alternative is to use Avid’s Timewarp tools. They allow you to create motion effects at any speed you like. Modern effects workstations can conform these things very cleanly in most cases.

The easiest timewarp to use is the “Trim to Fill” effect. It’s initially a bit counterintuitive, but once you’ve tried it, I think you’ll find that it becomes a standard part of your toolkit.

Trim to Fill Effect

First, cut the clip you want to slow down or speed up into your sequence. Then drag the “Trim to Fill” effect icon to it. Now go into trim mode and grab either end of the clip and stretch or shrink it. You’re not actually trimming the clip. It’s first and last do not change. Instead, you’re adjusting the speed of the clip. If you lengthen it, you slow it down. If you shorten it, you speed it up. To reflect the change, a percentage gets apended to your clip name. “27A-1” becomes “27A-1 (150%).” Note that the percentage refers to speed, not length. 200% means the clip is running at double speed. 50% means it’s running at half speed.

You can use all the standard tools to trim the clip and thus create any speed you like. Depending on your hardware, you may have to render the effect to see it play properly. That’s a disadvantage, but the old motion effects had to be rendered, too.

There is one surprise, though. Since trimming the clip changes its speed, if you really do want to trim it, you’ll have to remove the effect, make your trim, put the effect back and readjust the speed.

Trim to Fill is a subset of the “Timewarp” effect. The full timewarp option allows you to ramp your speed changes, gradually speeding a shot up or slowing it down. But it isn’t needed in most cases. Avid also offers other timewarp presets including a reverse motion effect and a 50% slow motion effect.

Note that even the simplest effect created as a timewarp looks smoother than the equivalent effect made the old way. That’s because timewarps do “motion interpolation,” creating additional frames as needed to smooth things out. If you make an old “print every frame twice” effect and compare it to a 50% timewarp, you’ll see the difference instantly.