Archive for the ‘Avid Technical Tips’ category

Making a Right-to-Left Wipe

August 13, 2010

For those of you using Version 5 for the first time, one of the biggest changes is the need to deal with advanced keyframes for most visual effects. This represents a big leap in functionality, but for people unfamiliar with the interface, there will be some inevitable speed bumps. I’ve put up an video introduction to the subject, here. (The video is slightly out of date in that you no longer have to promote effects — they’re advanced by default. But it should be helpful, anyway.)

I discovered another hidden feature the other day: The Reverse Animation button, which appears in some traditional visual effects, is missing in action in the advanced interface. You might use it, for example, to create a right-to-left wipe. Avid’s standard wipe is left-to-right. In the past, to switch it, you just hit Reverse Animation.

But in Version 5, when you apply a horizontal wipe, it opens the advanced keyframe interface, and the button isn’t available. It turns out that the feature is there, however, hidden in a contextual menu. To find it, right click on the effect track. Then select Reverse Keyframes.

Note the keyframe graph above. After selecting reverse keyframes, the graph inverts and the Swap Sources button is automatically selected, as shown below.

Voila, you have created a right-to-left wipe.

Introduction to the Smart Tool

June 10, 2010

Today is release day for Media Composer 5, Avid’s biggest update in years. Let me offer a big, hearty, “congratulations” to everybody at Avid who made this possible. You all are doing great work.

Avid is listening to editors again, for the first time in many years. There are workflow enhancements in this build, to be sure, but there are also long-overdue changes to the editing model. To mark the day, I’ve posted a new tutorial, offering a brief introduction to the Smart Tool, Avid’s new timeline palette that merges Trim Mode and Segment Mode into an always-on interaction model that should appeal to people who prefer a more segment-based, grab-and-drag editing style. This doesn’t begin to cover all the new features, but it should get you started. Avid has also created some videos of their own, here and here.

I’ll be demoing many of the new features at the Los Angeles Final Cut Pro User Group (LAFCPUG) meeting next Wednesday, June 16th at 6:45 pm. Meanwhile, I’m making final changes on my upcoming book, Avid Agility. With luck, it’ll be available at Amazon sometime in July. I hope you’ll find it essential reading.

Check out the tutorial below. A larger version is available on Vimeo.

One-Step Prelap

March 8, 2010

Overlap cuts (split edits) are fundamental for any editor. Most people create them in a two-step process, making a straight cut first and then overlapping it using Trim Mode. But there’s a hidden, one-step way to do it that you may find very intuitive. It only works at the end of your sequence, but that makes it very appropriate when you’re creating a first assembly and adding to the end of a growing sequence in the timeline. This short video (3:15) shows you how to do it. To view it at full size on Vimeo, click here.

The Clip Info Window

January 26, 2010

Here’s a feature that’s been around forever, but many people don’t seem to be aware of it. Say you want to find a piece of data logged for a particular clip. You open the appropriate bin, but the column containing the info you’re interested in isn’t displayed. You could open the bin’s Fast Menu, select Headings and display the appropriate column. But there’s a quicker way. Just Command-Option-click on the clip’s icon (in any view, including frame view). A window will open showing you all the data logged for that clip.

Better yet, you can do the same thing for clips in the source or record monitors. In this case, click and hold in the space between the source and record monitor position bars. Do it on the left side of that area and your window reveals data for the clip in the source monitor. Do it on the right side and you’ll see data for the clip in the record monitor.

MC Audio Dissolves Come in Two Flavors

January 13, 2010

Have you ever created an audio dissolve and heard an audible volume dip in the middle of the effect? Perhaps when you’re trying to join two similar pieces of fill? If it’s happened to you, you know how maddening it can be to eliminate. Final Cut offers a neat solution: two kinds of audio dissolves, one of which raises the level in the middle of the effect by 3 db. Audio editing applications typically permit even more choices.

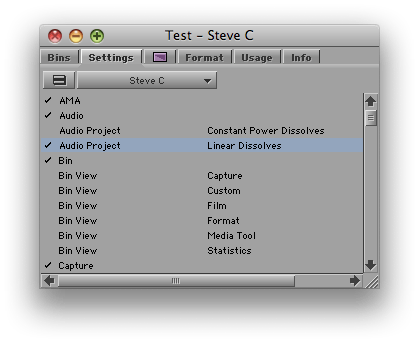
It turns out that the Media Composer offers a choice of dissolve types, too. But the feature is hidden in a setting and barely mentioned in the docs. I had thought it altered all dissolves, including the ones you’ve already made. But in fact, it affects new dissolves only; old ones are left alone. The setting is labeled “Dissolve Midpoint Attenuation.” You’ll find it in the Effects tab of the Audio Project settings panel. Similar to Final Cut, your choices are Constant Power, which adds a 3 db boost in the center of the dissolve, and Linear, which is the default.

The trouble with this implementation is that it’s hard to quickly alter an existing dissolve and compare options. And you have no indication in the timeline of the type of dissolve you’ve created. FCP allows you to change a dissolve type with a contextual menu pick, and it labels each effect in the timeline.

But while not ideal, in practice you can make the MC method work. Simply duplicate your Audio Project setting (select it and hit Command-D). Then open each setting by double-clicking, adjust one to be Constant Power and the other Linear, and name them appropriately. Once you’re created these settings, you can quickly switch between them by clicking in the area to the left of the setting name (putting a check mark there).

You probably want to let Constant Power be your default. For most dissolves, it’s more likely to produce a smooth transition. For fades, you may prefer the Linear setting.

I’m wondering whether readers here have used this feature. It was a new for me and I’m curious whether you’ve tried it and how it’s worked in practice. Please share your impressions in the comments.

Final Cut User Group Videos

December 12, 2009

Video from the LA Final Cut Pro User Group meeting I spoke at is now available for download via the Open Television Network. The meeting covered new features in MC 4.0 and featured presentations from me, Walter Murch and Shane Ross. Details are in this post. The video has been divided into three parts, one for each of the presenters. It’s not free, but the prices are minimal and the quality is excellent. Go to the LAFCPUG page on the Open Television Network and enter your credit card information. Click the link to subscribe to the feed via iTunes. Buttons for all recent episodes will appear in the iTunes podcast page. Take a look at the free previews or download each segment in full. It sounds like a hassle, but it worked well for me and only took a minute or two. You’ll get a signup discount of $5, so watching all three parts will cost you a whopping $2.47.